Showing posts with label StampinUp. Show all posts

Saturday, June 29, 2024

Midway Geyser Basin - Two Page Travel Scrapbook Layout

I'm back with another layout from our Grand Tetons trip. I can't believe this was 4 years ago. I'm very slow to post layouts, but I'm getting it done now!
This layout is from the Midway Geyser Basin in Yellowstone! It was so crowded! It was the middle of Covid and people were trying to get out into nature, even with throngs of others. It didn't bother us, though, because we were outside. It felt normal to be out traveling. It was frustrating to find decent parking, though. 
The paper is from Close to My Heart "Timber" and Simple Stories "Color Vibe". I created my own title, skooching the letters together and welding to just have one piece to attach. I'm not sure how we survived the years of attaching separate letters (alpha stickers!) before we could create and design our own titles! It was brutal! The Adventure Outside stamp is from Close to My Heart and was inked with a StampinUp marker. 
 I used some denim self adhesive washi tape for additional texture. I wish I would have matched the title color to this shade of blue. You know what they say about hindsight... 

Thanks for stopping by for my last few layouts from the Grand Teton! Have a great weekend!


Friday, September 30, 2022

Explore - Two Page Scrapbook Layout

Today I'm sharing another layout from the sunflower field photo shoot a few years ago. This one features my sweet, and super smart grandson! This little man is such a blessing!

Just look at him! What a little stinker. They were both enjoying all the attention. 

This is one for his album. He enjoys looking at his book almost as much as his Sissy. I really need to add to it more often!! Slacker Grandma. 

The paper, journaling card and zip strip are from Close to My Heart "Dream Big" collection. I cut the title with my Cricut. I added some little banners and woodgrain pieces from my scraps and the buttons and markers are StampinUp! I added a little bit of narrow sunflower washi tape to attach the journaling card on the side. 

This is a really simple layout, but I absolutely love it, mainly because my favorite people are gracing the pages with smiles.

Thanks for stopping by my blog today! Enjoy this amazing fall weather!
 

Tuesday, October 12, 2021

Apple of My Eye - Two Page Fall Scrapbook Layout

 Fall is my favorite!!! Apples, gourds, pumpkins and everything else. Today I'd like to share a layout from a few years back featuring pictures with our grands from one of our favorite orchards.

Do you put titles on your page? I almost always do. It's another way for me to be creative with my page and make it all my own.
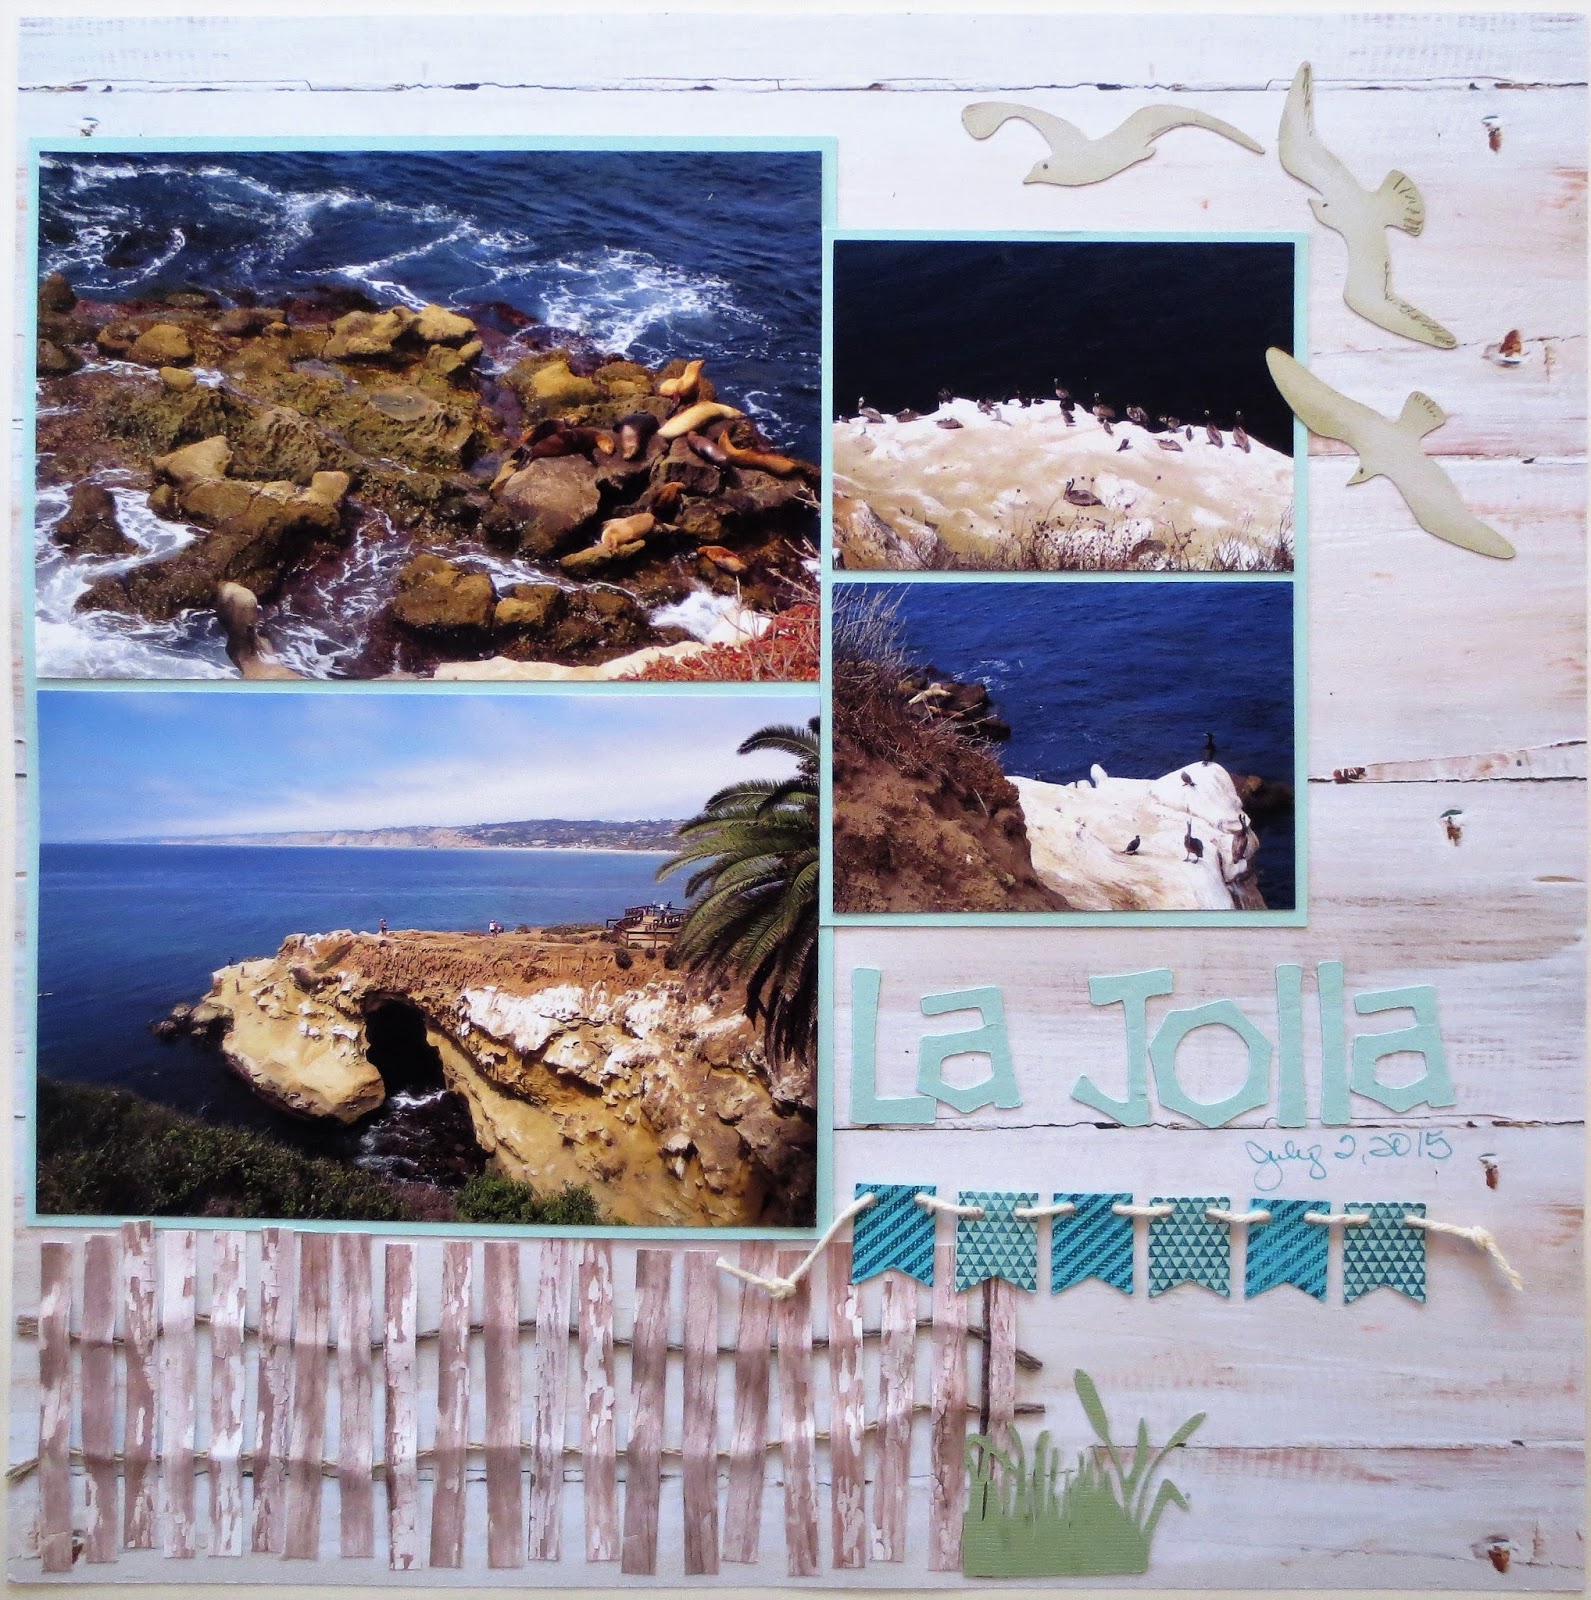
I used some numbered washi to line the edges, and multiple scraps of matching fall themed patterned paper. I do love to mix and match. I only had one sheet of the apple paper, or I may have used that all the way across. Leaving a space between the strips was a new thing for me, but I think I like the effect and also leaving a border all the way around and between, if that makes sense.
I matted the photos in black so they wouldn't get lost on the page. This really helped them to stand out, and also tied in the black printed washi tape. Same idea for the black and white baker's twine around one of the photos.
An apple-picking page just wouldn't be complete without layering up some apples!! Using my StampinUp! scalloped punch, I punched around one of the apples on the patterned paper, then matted it again with the 2" circle punch, then popped it all up on the page using dimensionals. 
The orchard and pumpkin picking is one of our fall traditions with the grands. Love them so much! I can't believe this layout is already two years old!! They are growing up so fast! 😒

Hope you enjoy this layout. I have a few more layouts to share for fall as well as a few Halloween layouts. I better get cracking and start posting more often. Have a great week!!


Thursday, June 3, 2021

Cherish Every Sunset - Two Page Lake Michigan Scrapbook Layout

 Happy Summer! I think everybody is ready to get out and GO!! Somewhere...Anywhere! These pictures remind me of the absolute beauty of our country. We'll be heading up to Lake Michigan next month, and I can't wait!! Until then, I will enjoy reliving these family memories from a few years back. 

Holland, MI is one of our favorite Lake Michigan towns. We were amazed by the sunsets we saw during this trip. My husband  captured this sunburst picture as we were making our way into the tunnel at Tunnel Park just as the sun was going down.

The paper is from a vintage summer stack that I've had on hand for awhile. I love this paper stack. The colors are perfect for the lake, beach, sunsets, etc. The orange patterned washi helped the orange in the sunset to really pop off the page and the light aqua striped washi adds another layer of texture. I used a StampinUp! journaling stamp to  frame my journaling, and matted it twice. The final touch on this page is the silhouette of the beach grass on each lower corner. The idea came to me from the photos themselves, and I love how it turned out. It also gave me the perfect place to add the date with a white Jelly Roll pen. I designed and created the title in Cricut's Design Space. 
In my opinion, a sunset just doesn't get any better than this. I guess a few clouds scattered about might have added to the skyline, but Lake Michigan will always be one of the best places to say goodbye to a beautiful day.
Thanks for stopping by my blog today. Hope you are having an enjoyably productive week!


Thursday, January 21, 2021

Scenic View - Two Page Maui Scrapbook Layout

 Time for some more sunshine? 

One of our daily explorations led us to this amazing site! We had no idea what we'd find as we drove along the beautiful coastline, taking in all the sites, and hoping to find a restroom. I was getting a little worried about the restroom since we were in the middle of an extraordinarily beautiful "nowhere".
Then we came upon a beautiful little gift shop with the most gorgeous view of the mountains. Truly amazing. We took a bunch of pictures and shared a smoothie, soaking up the beauty around us.
I combined two bold prints for this layout. Too crazy? I like how the black and white accents pop off the page and the simple white flowers were just enough. I added some decorative tape with arrows and used the Cricut to write my journaling and create the title.

Thanks for stopping by my blog today. Hope your week is going well!

Thursday, December 17, 2020

Merry Christmas - Two Page Layout

Here's another two page Christmas layout from 2018. These pictures are from our celebration with our boys and their families. So precious to me!! It's always tough to fit in all the pics that tell the story. As I've mentioned in the past, wallet size pictures help so much, and they add a little variety to the layouts.
It's fun watching the "big kids" open their gifts too. I try to shop throughout the year to find fun things that are unique and special. Especially for the girls!! Raising two boys was fun, but shopping for these girls is a special joy...something that I looked forward to for so long. So I spoil them a bit!
I love watching the expressions on all of their faces as they open things from each other and from us. There's nothing better. 
This paper is from the same Christmas pack as the last layout that I shared. I love the rich colors and the patterns. The title was cut with my Cricut. I used some Wink of Stella to add some shimmer on the bow and also on the poinsettias that were punched with StampinUp! five point flower punch.
Three different patterned papers that all look great together and help show off the photos. I was able to use 10 pictures on this layout and still add embellishments, journaling, and a title. 
Thanks for stopping by for another Christmas layout! Hope your days leading up to Christmas are productive, fun, and memorable for years to come!! 
 

Wednesday, December 16, 2020

Merry Christmas - Two Page Scrapbook Layout

 Here's another Christmas layout from 2018. Actually, we didn't celebrate Christmas with the extended family until January 2019. Do you struggle to scrapbook Christmas photos? I really struggle... I think it has to do with each year's pictures looking similar, multiple colors on groups of people all in the same layouts. I'm not sure, but they are definitely not my favorite pics to scrap.

The weird thing is I usually like the layouts when I'm done agonizing over them. One thing that helps me is using a pack of matching Christmas paper. When I can mix and match it all together, then at least the paper decision is easier. For this one, I chose a predominantly black background poinsettia paper. It seemed like there was a lot of black in the photos, so that helped tie it all together.
I used my border punch to cut some ivory trim for the edges, and cut a tone on tone green paper for the sides. My StampinUp! five point flower is my "go to" punch for quick flowers. I used two layers of red with a button. The leaves are punched with the same punch out of green cardstock and then cut into leaves. Simple... Strip journaling briefly tells the story of our extended family shenanigans.
We love each other so much, and enjoy being together for an entire weekend. My husband's siblings and nephew stay over with us, and my kids who live in town, sleep at their homes, then come back in the morning. It's exhausting but so much fun!! We can't wait until January so we can be together again!

Come back in a few days for some more Christmas layouts!! I really need to get at my Christmas cards! Did you make cards this year? I hope I still have time...Why don't I craft like it's Christmas in July??

Have a great week!!


Wednesday, November 6, 2019

"Team Bride" - Two Page Wedding Layout

Hope you all had a fun Halloween. It's not my favorite holiday of the year, but I do enjoy seeing it through the eyes of my grandchildren! We had a fun time trick or treating the neighborhood together. Scarlet was a hippy and Sawyer was a lego, but he already took off his costume before I snapped the pic. Somebody told him Legos can be pretty scary when you're barefoot in the middle of the night.πŸ˜‚ Oh, how I remember....
Fall is slipping into winter so quickly! Yikes! I'm not ready to give it up yet.

Thought I'd share some more of my son and DIL's wedding layouts. Here's a layout featuring the lovely "Bride Tribe". They were so photogenic, it was really hard to choose what pics to feature on the layout.
 Above is the right side of the layout. Apparently, I forgot to snap a picture of the left side. Sorry about that, but you can zoom in on the pic below if you want to see it more closely. I used a mixture of both black and white and color photos on most of the layouts in the album. I like the contrast of the black and white!
I kept it simple with 3 banners of different lengths going different directions from my scraps. I used the largest banner on the left to balance out the fewer pictures and to highlight the title. The title could have been a bit bigger, now that I look back at this.😞 The antique round brads are from StampinUp! The paper flowers have been in my stash forever and helped to make the page look more feminine along with the blinged up little bitty butterfly.

Thanks for stopping by my blog today! Stay warm out there! 

Saturday, November 2, 2019

Halloween Treat bags

How was your Halloween? Do you make special treat bags for your favorite Trick or Treaters? I try to make something cute for my little grands every year. Even if it's as simple as using a brown paper sack and drawing a silly face or Jack-O-Lantern on it. This year I cracked open my Cricut !
The owl is for the little Miss and the Bat (or is it Dracula?) is for the little Mr.
I found this bat bag in Design Studio. It fit perfectly on a 12" mat and one sheet of 12x12 cardstock with a scrap of green. I may need to buy a bigger mat and enlarge the bag for next year...They may need more candy?? πŸ˜„ I did change the eyes and the mouth on the bat. I think he will like it!
For the little Miss, I used the same bag design, but found a cute owl for the front. It was pretty easy to size the owl to the proper size for the front of the other bag. I ran it through my Cuttlebug to look like feathers. And those little feet!!! 😍 I'm a bit of an owl freak, even though the little Miss is not as excited about them as she used to be.
I used my new StampinUp!'s" Everything Festive" to stamp a cute tag to tie on the side. I wish I would have had black and white baker's twine...I will have to get some for next time!

Our Trick or Treating night was postponed from Thursday until tonight! Isn't that crazy?? We had really strong winds on the 31st and the authorities were concerned, because it was also so wet and rainy, that power lines or trees could get blown down and hurt somebody. Hmmmm....I guess there is a first for everything!! Anyway, I'm looking forward to trick or treating with my favorite 7 and 5 year old. πŸ˜ƒThen they are sleeping over!! PawPaw and I love making memories with them!!

Thanks for stopping by my blog today!!!

Friday, August 16, 2019

Two Page Scrapbook Layout - "Giddy Up"

Here's my last Indiana State Fair layout to share. This is my beautiful granddaughter riding a pony for her very first time. I was so excited for her!! She was a bit nervous, but seemed to enjoy it once she got through the line and started riding. I've loved horses for most of my life, so I especially enjoyed seeing her eyes light up!!
 I used Simple Stories "We Are Family" collection. I randomly doodled my own cross stitches on the blue cardstock to tie in with the patterned paper. Once again, my StampinUp! five petal punch was perfect since it's similar to the flowers on the patterned paper.  I topped them with little buttons from my stash. Red and white checked washi came in handy as an accent. The journaling card is from Basic Grey.
 I found the cute title in Design Space. So perfect for a little girl's first pony ride!!
Thanks for checking out my Indiana State Fair layouts this week. If you get a chance to visit one of the State Fairs, you should definitely go check out the animals, ride the rides, and enjoy some yummy fair food! It's a wonderful way to spend a summer day, especially if your grands are as adorable as mine. ❤❤

Wednesday, August 14, 2019

Two Page Scrapbook Layout - "Udderly Fun"

Here's a fun layout from the Indiana Fair two years back! It's going on now. Wish we could get there, but it's been such a busy, busy summer. These layouts remind me of the sights, sounds, and yes, the smells, of our day at the State Fair.
I think we all left that barn wanting a cute baby calf of our own! 😍 They wouldn't be too much work, would they? They're actually smaller than our dog and I'm sure he'd like a playmate. πŸ˜€πŸ˜
 The cute paper is by BoBunny"Kiss the Cook" and Reminisce "In the Kitchen". I love the red accents with it. I cut the title and cow with my Circut. The State Fair embellishment was made with a scalloped circle punch and a 2" circle punch which fits perfect inside of it. I used a little bakers twine and a Kraft tag on top. I love to layer my embellies.
Thanks for stopping by my blog today. Come back to see one more State Fair Layout on Friday morning! 

Sunday, February 19, 2017

Two Page Scrapbook Layout - "Seaside Stop"

I think this is the last layout I have to share of our California trip in June, 2015. It was a fabulous trip!! We're heading back for a business trip next week, but there won't be much time for sight-seeing, so I probably won't take very many pictures.
 I adore this paper from We R Memory Keepers. The California journaling tag is from Echo Park wrapped with Karen Foster Scrappers floss. The burlap flowers are Paper Studio.
 I punched several different size mini flowers with my StampinUp punches and layered them up to create different flowers. The title font is called "Seaside".
Thanks for stopping by my blog and checking out the last of my California layouts. Have a lovely day. The sun is finally shining here in NE Indiana, and I'm loving the warmth!

Saturday, February 4, 2017

Two Page Scrapbook Layout - "LaJolla"

Here's another layout from our 2015 trip to beautiful, sunny California. Looking at these pictures makes me long for sunny warm weather!
 LaJolla is a beautiful little seaside town that we consider to be a "must see" if you are near the San Diego area. There are some great shops and eateries in town, a pretty beach, and sea lions to watch on the rocks below.
The paper is Kaiser Kraft's "Sea Breeze Collection" and the fence is cut from narrow strips of Close to My Heart woodgrain paper. The fence was a little time consuming, but I love the way it turned out. I laid down a length of hemp cord (Hemptique) and glued the strips of paper on top of it to hold the hemp in place, creating the look of a distressed beach fence.
 The banner is punched with StampinUp's bitty banner punch. I used a small hole punch along the top and wove white string through it to create the banner.
 The title font and seagulls are from Cricut's Life is a Beach, and the grass along the fence is Wild Card.
Thanks for stopping by my blog today! I have one more California layout to share in the next few days, and I think the show and tell from that trip will be done. Time to go back!!

Wednesday, January 11, 2017

Two Page Scrapbook Layout - "Home Tour"

Time to share another Key West 30th anniversary layout!
If you ever go to Key West, the Hemingway House is definitely worth your time. We enjoyed checking out the architecture, simple furnishings and dΓ©cor. However; the six toed cats were our favorite!! They're everywhere. They are very well cared for and quite friendly.
 I framed my title with an arched window and open arched shutters cut from Cricut's Art Philosohy  to look like the windows on the house. How boring would the title have been without the window? πŸ˜ The patterned paper is StampinUp with ribbon from Paper Studio, and green chevron washi from Queen & Co. The StampinUp five point flower punch and bitty scalloped circle punch worked great for the flowers, topped with buttons.
Thanks for stopping by my blog today! See you soon.