Showing posts with label dry embossing. Show all posts

Tuesday, November 24, 2020

Turkey Treat Boxes

 We are looking forward to our Thanksgiving meal with our precious family! How about you? It's a crazy time and many people aren't able to get together this year. Our group is small, but very close and I'm so thankful we can still make it work. 

I thought I would take a minute and share these turkey treat boxes that I made for my grands last year. The box is from Design Space. It's called a "fry box". After cutting the box, I ran it through my cuddle bug to make it look like feathers. The eyes are two different circle punches. I cut a few feathers from various patterned paper scraps in different colors,  then free handed a gobble and beak. If you don't like the idea of free-handing, you could easily use a triangle for the beak and enlarge and stretch a comma for the gobble. Remember you can stretch and morph the shapes. Get creative! 

Kids aren't always very excited about turkey and all the fixings, so these little peanut butter Ritz crackers gave them something fun to snack on.

Hope you enjoy your family this week!! We all have much to be thankful for...even in 2020. 

Thanks for stopping by my blog today!


Monday, May 4, 2015

Masculine Cards to Share

Here are some masculine cards that I created recently. Most of my cards were "Pinspired". I love Pinterest.

Father's Day Card with barb wire embossing and StampinUp! designer series paper.

Here a Father's Day card I made for my son because he's such an awesome Daddy. The embossing folder is from Tim Holtz. Many of the other embellishments were lingering in my stash.

This Father's Day card was for my hubby. The stamps are StampinUp! I created the blotchy rectangle by inking up a clear plastic stamp block with Tim Holtz "old paper" ink. I love the way it turned out.

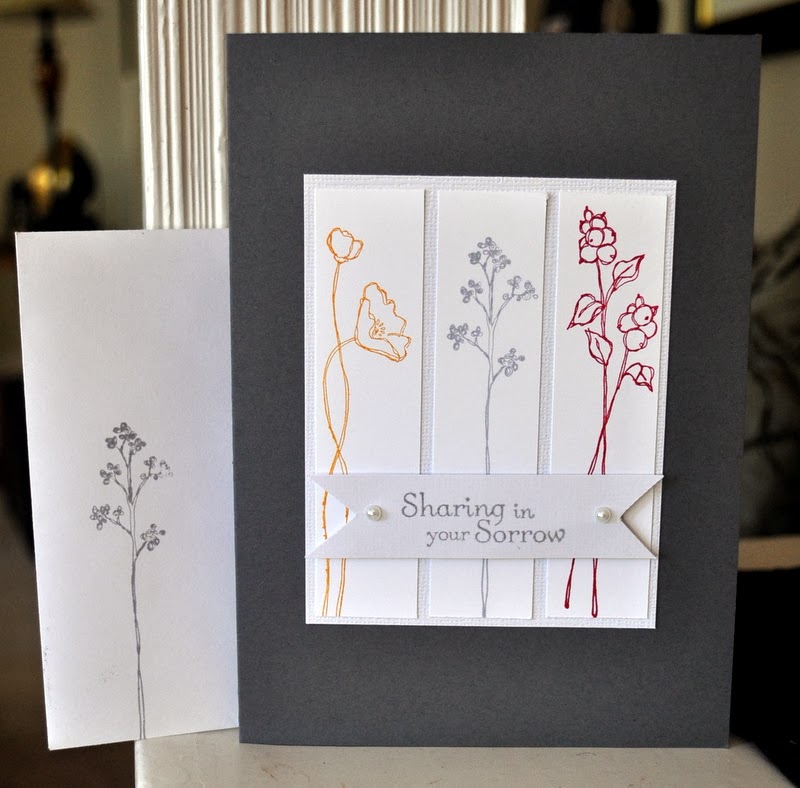
I dislike needing sympathy cards so often, but it's so nice to be able to bless the family with a beautiful handmade card. This one was created with the Mighty Oak die set from Papertreyink.
Thanks for stopping by my blog today. Enjoy your week!

Tuesday, November 25, 2014

Double scrapbook layout - "Heart Blessing"

Are you ready for Thanksgiving?? My groceries are bought and I'll be starting to whip up all of our favorite sides and desserts over the next few days!
 Last year, we enjoyed having the family here with us too. We are so blessed to have them so close and be able to spend every holiday together!! The food, if I do say so myself, was marvelous and the memories even more sweet than the pecan pie!
 The paper is from Bo Bunny. I used a Sizzix embossing folder and my Fiskars border punch for the strip down the middle. The title font is Cricut's Lyrical Letters cartridge.
 The leaf outline is from Accent Essentials. The feather stamp is Glitz Design, but the larger feather was hand drawn and cut. I fringed it with Martha Stewart fringe scizzors.
We are looking forward to another family time of giving thanks to our Lord for the many blessings he gives us each day. This year, we will celebrate our new grandson's first Thanksgiving! We're so thankful for our sweet growing family!! There's always room to pull up another high chair. =)

Enjoy your family and remember God's goodness in your life. 
result

Luke 6:38 [Full Chapter]
Give, and it will be given to you. A good measure, pressed down, shaken together and running over, will be poured into your lap. For with the measure you use, it will be measured to you.”

Tuesday, October 21, 2014

Two 2 Page Layouts - "Birthday Bash" and "Family Ties"

Here's another birthday layout of my boys from August 2013. Keep in mind there are two birthday boys here, so I think I'm completely justified in scrapping three layouts of this joyous event. :) The other two are in the previous post.
 These pictures are all about the cake and the gifts (and Scarlet) from two different celebrations. The first celebration was on their birthday with my oldest son and his family at our house, and the other in one of the study rooms at BSU.
 The paper is My Minds Eye "20th Street Market" and Jen Wilson's "Breaking Free". The paper banner across the top is Basic Grey "Knee High and Bow Ties"...perfectly appropriate for two grown men, right?
 The top layer of the tag was dry embossed and then chalked. The Birthday Bash title is cut with Cricut's "Birthday Bash".
I'm more than a year behind in posting layouts. These have been scrapped for months, but it takes me awhile to get them posted. Hopefully you share my opinion that it's never too late to share an idea.

This layout is from an early 80th birthday celebration with extended family for my sweet Momma. Her equally sweet sisters came from all over the country to celebrate this momentous occasion.
My Mom has Parkinson's, so if she doesn't look real perky here, you will understand that she was pretty worn out from all the excitement. I have loved seeing pictures through the years with her and her three sisters together. They are all such beautiful women, inside and out.
There are a ton of pictures (11 to be exact) and I struggled to get them all on and still have it look decent. It's probably too many, but they are all such precious memories. The bows were added to "tie" it all together with the title.
The SU patterned paper bows were Pinterest inspired and punched with an oval punch, then folded and notched to look like a bow.
Thanks so much for stopping by my blog today. Have a productive day!! =)

Monday, September 29, 2014

Two Page Scrapbook Layout - "Love My Team"

Where has the time gone!?! September is almost over and fall (my favorite!!!) is definitely in the air. It's time to break out the back to school, homecoming, and football layouts!

Last fall was my son's Junior year in college. We had fun with him at BSU on parent weekend. The bright colors always make a fun scrapbook page.
 This Creative Memories cardstock was a nice back drop for the vibrant pictures.
 Here's a close up of the upper left detail complete with red washi ruler tape and dry embossed banners.
 The game is always entertaining and the weather was perfect!
 Do you use many stick pins on your pages? I sometimes forget I have them, but I like the extra detail this star pin adds to the title.
It's hard to believe that my baby has grown up and is already into his senior year! How and when did this happen?? I know every Momma feels this way...He's such a great kid and we are so very proud of the young man he has become.

Come back Thursday for another college football layout!

Thursday, November 28, 2013

Fall Themed Cards

Happy Thanksgiving!! Hope you are enjoying this great day of thanks and praise and are taking time to think about your many blessings.

We had our whole immediate family here today for a traditional Thanksgiving meal with all of the trimmings. Almost 28 years ago, when we were first married, there was just the two of us around the table, and then there were four of us after we had our two boys. Three years ago my oldest son blessed us with a lovely daughter-in-law! Last year, we were blessed by a sweet little granddaughter who brings us so much joy!! And...we are expecting our second grandbaby in April of next year!! We are truly blessed!!

I'm hanging on to this day of Thanksgiving for the entire day today. The hustle and bustle of Christmas will swoop in on us tomorrow, but for today, it's still a day to give thanks to my God for who he is and all that he does. With all the beauty of autumn in mind, I'm posting a few cards that share this theme.

This Thanksgiving card was Pinterest inspired using the SU grunge stamp.
 Another super simple design of layered scraps.
 I dug out my SU layered photo corner punch to make this super simple Chevron design on Kraft.
 This is another Pinterest inspired design that I made into a sympathy card.
 Love the beautiful leaves on this SU set...I'm sad to put it away until next fall. =(
 Another Pinterest inspired Sympathy card.
 This is the birthday card I created for my Mom. She loves all the beauty of autumn.
 Another super simple sympathy card. I love to use texture folders. I can't get enough of them.
Thanks so much for stopping by my blog today! Hope you will find that you have so many blessings, that you can't even count them all. :)

Tuesday, September 10, 2013

Two Page Layout - "Squeaky Clean" and lively lantern redo

Summer is back for a few days. Hope you are enjoying your air conditioning like I am.

I spent the last few days photographing layouts, uploading, and editing. Wow! I have many layouts to share with you. It's been awhile since I posted a grandbaby layout. Here's a bath layout of our sweet Scarlet Rose. I'm probably not sharing her layouts in chronological order, but this one grabbed me today.
 All of the patterned paper is from a stack of Martha Stewart baby girl paper that I picked up for a song at Meijer. I keep reminding myself I need to use the baby paper as much as possible, because she's growing up so quickly.
 I cut big chunky letters and layered together little yellow ducks and dry embossed them both in the Cuddlebug for additional texture.
 This was probably the last time we bathed her in the kitchen sink. She is big enough to splash and play in the bathtub now. We are so blessed to have her. Little girls are so much fun!

Since we're having such a great summer day, I'll share a recent spray paint project. I had three matching neutral metal lanterns on my porch that were pretty boring.
 After cleaning out the old wax, I cleaned them up and sanded them a little bit on all of the painted surfaces, and wiped them down with a damp cloth....Spray painting is so much fun! These lanterns got a major rebirth in three eye-popping colors.
 The blue is actually more of a teal color. Not sure why it looks blue here. I love the little battery operated flickering candles...No more dirty old wax to scrape out.
 It all started with this clearance rug from Walmart. The porch looks so much livelier and we've been spending more time out there since we gave it an inexpensive facelift with accessories.

Thanks for stopping by my blog today!!

Thursday, August 22, 2013

Two page layout - "Birthday Wishes"

Happy Birthday to my awesome kiddos!! My boys share the same birthday TODAY! Joel turns 23 years and Jacob is 21. Everybody always asks me how I managed to have my sons on the same day, two years apart. I have absolutely no idea, but it was apparently God's plan that Joel receive a special little bundle on his 2nd birthday. Somebody he would always love and have as brother and friend.  We are so proud of our kids and the strong, faithful young men they have become. They have truly blessed our lives.

Today is the perfect day to share the layout of last year's birthday celebration. Since they are used to celebrating together, we've started a tradition of celebrating with Jacob at BSU on their special day. I'd rather we were all at our home for the occasion, but we try to stay flexible and do whatever works best for the whole family. Muncie is just an hour away, and the cake will travel. :)

Pink Paisley "Indigo Bleu" was the perfect set for the occasion. The banner on the left is a layer of washi tape, and a banner made with flowers and circles. I realize the page is all about the boys, but I think the flowers are still appropriate.
 Here's a closer shot of the banner.
 They opened their presents together and Jacob got to cuddle his niece for a little while. He really misses her when he's away at school. So thankful he's not too far away for a visit now and then. The title is cut with Cricut's "Birthday Bash" cartridge and dry embossed with a chevron design (Lifestyle Crafts). The yellow Washi helps highlight the title.
 I used StampinUp's "Details" for the journaling lines on the right. I poked two holes on each side of the family shot so I could wrap and tie it with hemp. This helps to tie in the texture from the banner and highlights the family pose.
This crazy bunch certainly has my heart! I love them so much. Family is the best blessing ever!! It's fun to watch them grow up and start their own families. The best thing about boys is they bring amazing young women (wives and granddaughters) into your life. This year we will celebrate together on Saturday to accommodate Joel's work schedule, but we'll Skype tonight. Can't wait!

Wednesday, July 24, 2013

Pop Up Owl 1st Birthday Card and Altered Frame

Our grandbaby turned 1 year-old in April!! Can't believe how quickly time flies, even with grandchildren. Of course, I made her a card to celebrate!! Her nursery has an owl theme, complete with a tree mural hand painted by her Daddy (my oldest son). It's really not my fault that I have become a bit obsessed with owls!

Who doesn't love a pop-up card, especially with an owl? :) Here's the front.
Here's the inside, complete with baby girl owl and scalloped oval banner.
 If you've never made a pop-up card, it's really not hard. You'll have to check out a few of the tutorials  like this one. I didn't take pictures of each step, but basically you cut two matching slits in the fold of the inner card layer (brighter pink) for each item you want to pop up.
 You can see the slits between the owls feet. The section of card between the slits is folded towards you (the opposite of the fold in the card) which creates a stand for this baby owl.  It's really as simple as that. I used stickers for the sentiment. I used pink glitter cardstock for the "1st".

Her birthday party theme was Minnie Mouse and there were lots of polka dots and zebra prints! So much fun! I can't remember where I got this frame, but I decided to add a few pretty flowers and we used it at the party with a cute baby picture of our birthday girl, Scarlet Rose.
 The flowers were made with my three SU scalloped circle punches and brads. Super easy. I crumpled the paper to give them more texture.
 Three simple flowers added a lot of pizazz to this frame.
Thanks for stopping by my blog today! 

Wednesday, July 17, 2013

Two double layouts - "Bath Time" and "It's a Girl Thing"

Hope you are all having a wonderful day. Mine has been filled with a busy, busy work day, emptying dishwasher, making dinner, and now time it's time to share a couple of layouts.

Once again, sweet Scarlet is the center of this Grandma's scrapping attention. She's a doll and these pictures are too precious....Rub-a-dub-chubb! LOL! I can't get over how she's changed. She's walking now and no longer bathes in my kitchen sink. =)
 The Chevron patterned paper is My Minds Eye. The bottom border may be from a Martha Stewart baby pack. Cuteness!
 Her smile melts my heart! The duckys were cut with Cricut, layered together, and then run through Cuddlebug for a feathery look. The title is also cut with Cricut's "New Arrival" cartridge. (Thank you, Jodi!)
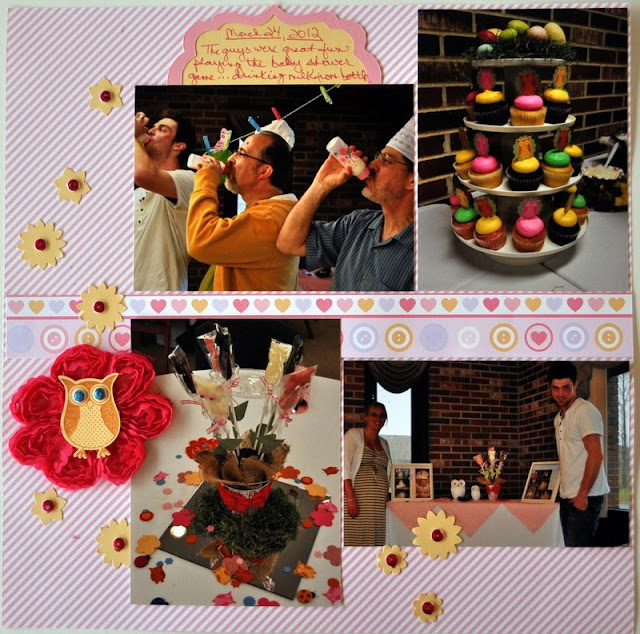
This next layout is really old. Not sure why I haven't posted it until now. It's obviously pre-Scarlet! We had so much fun with the baby shower and had great pictures....My son, husband, and Brother-in-Law drank milk from baby bottles for one of the games. 
Yes, I'm now kind of an owl freak!  If you want to see the posts about the decorations, you can check it out here and here. These two posts are some of the most frequently viewed on my blog. Apparently there are other owl freaks out there. =)
 The fabric flowers and punched and stamped owls were leftover decorations, so it seemed appropriate to use them on the scrapbook page. We were just so tickled to get a girl for our first grandbaby!!! My husband and I raised to wonderful boys, and I grew up with a brother (no sisters). I've been deprived of all things pink and ruffly. We sure are making up for lost time in the pink side of life!!
Thanks for stopping by my blog today! Stay cool!