Showing posts with label Card designs. Show all posts

Monday, January 16, 2012

Owl birthday card

Hope everybody is starting off their New Year in a positive way! All I can say about mine right now is that I'm really busy at my day job. No complaints, though. I'm so happy to have a job that I love at least 9 days out of 10. =)

Today I have a cutie owl birthday card to share with you.

I made this for my Dad's birthday in December. The stamp is from Tattered Angels. I'm not a huge fan of coloring stamps, but I like the way this one turned out. The edges are all distressed and inked with Tim Holtz pumice stone ink. I cut the sentiment banner freehand. The sentiment stamp is from StampinUp! The patterned paper scraps are My Minds Eye "Bohemian". I used Kraft for the base.

Thanks for stopping by today!

Monday, December 19, 2011

Christmas Cards

Merry Christmas week to everybody! Are you ready to celebrate?? I'm getting a little bit more done every day. I can't wait!!
I was not able to make all of my Christmas cards this year, but I did crank out some multiples of a couple of designs. They are so much fun to make, but always more time consuming than it seems like they should be. =)

This card was inspired by a design for an invitation that I saw recently.
Most of the patterned paper is My Minds Eye, Laundry Line. It's all glittery and shiny! Perfect for standout trees. The sentiment is from Technique Tuesday. I splurged on theTPC Studios metal accents with glitter. =) Love the way they added some additional bling to my card.

The second card was inspired by Scrapbooks, Etc. I used a couple of different kinds of scrap paper. These are both from Echo Park.
 
I added a dry embossed background and used glitter paper for my snowflakes, along with the remaining TPC Studio metal snowflakes used on the previously shown card. The sentiment is one I got on clearance last year from Michaels.
And last, but not least is my own design. I was inspired by a tee-shirt! Do you ever get weird inspirations like that? It happens to me regularly, but I don't always have time to follow through on the idea.
Obviously, a very non-traditional color scheme, but I think it worked nicely with the retro look I was going for. I used glitter paper for the dove, which was cut from Sweethearts cartridge (Cricut). The peace symbol stamps are Inkadinkadoo and heat embossed with holographic embossing powder. The retro "peace" sentiment is Close to My Heart. I sponged some pink and green ink around the embossed peace symbols.

Thanks so much for stopping by today! I just noticed on my blog stats page that I have surpassed 10,000 page views on my blog!!! Wow! Thanks for all of the views. I believe this deserves a nice giveaway after the holidays!!! =) Hmmmm.... What shall I give away?

Monday, October 3, 2011

Rosette Pumpkin and Fall card

Hello! I am loving the crisp fall air! It's my absolute favorite time of year. The colors are just starting to show and there are no leaves to rake yet. =)

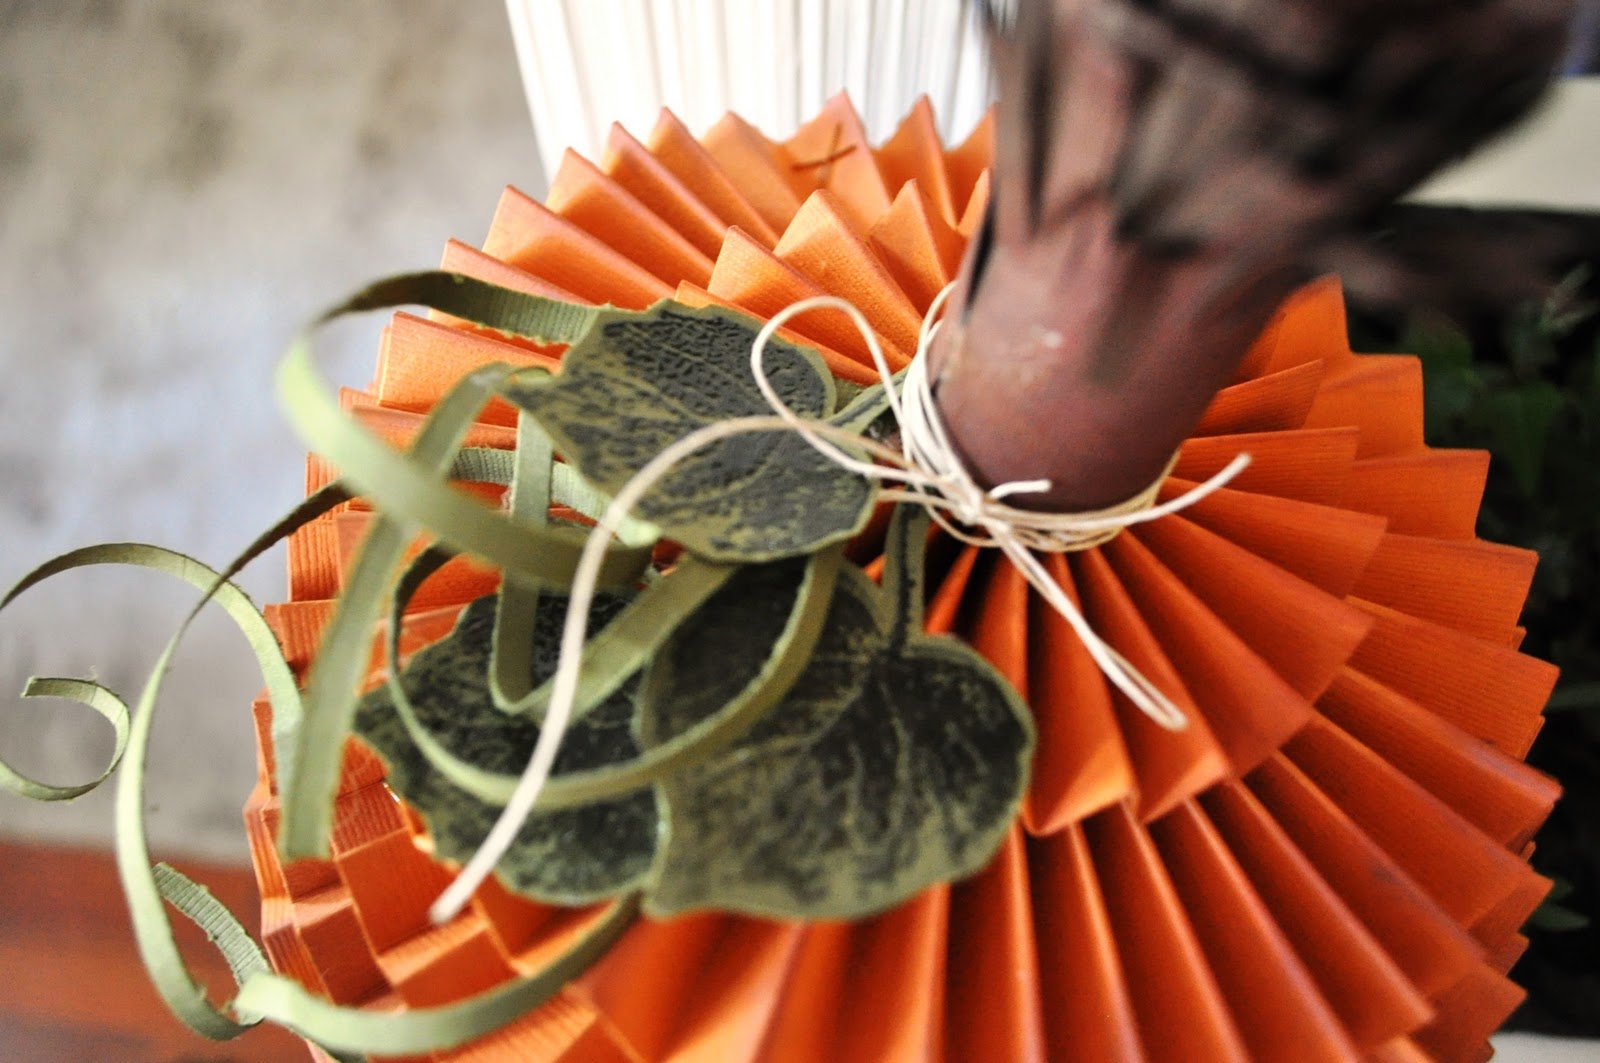
I went to Archivers the other day with my best scrappin buddy and picked up their free project sheet for this cutie patootie pumpkin! I bought the paper that day because I just had to try it. I haven't had much opportunity to scrap or craft and I've been loooonnnnging, to get my goodies out and make something fun.

So here is my finished pumpkin! I love the way it turned out so much that I'm making a couple of more. I'm not sure yet whether I'll vary the size and shape or stick with the instruction sheet. This cutie pumpkin is for my sweet Mom. She had her 78th birthday last weekend. I hope she enjoys looking at it as much as I enjoyed making it!

Each layer is a rosette created using strips of paper and my Martha Stewart scoreboard. Wow! I had never used it before and it was so incredibly helpful for this project. I think I will use it a lot more now! Each strip is scored, edges are inked and the strips are all attached into a circle with little staples. I just happened to have orange ones. Perfect! I used a cirlce punch to cut centers to secure the rosette on the top and bottom. Once all the sizes of rosettes are made, you just hot glue them all together.

The darling stem is also made of strips of paper. I used a wider strip than their instructions called for. I like long stemmed pumpkins! My strips were about 2 1/2 " wide and I used Martha Stewart fringe scissors along the side of each strip. You just roll them up on each other until the strips form a stem in the width that you like. I tied a small piece of twine around the base of the stem. The leaves were stamped with StampinUp French Foliage stamp. I then stamped over the green with Versa Mark ink, sprinkled with clear embossing powder and then used the heat gun. I cut out the three leaves and attached with hot glue. The green strips are 1/8" and curled with a pencil.
Thought I'd make a card for my Mom while I had all of my supplies out. I had already sent her flowers and a card for her birthday, so I decided to make this more of a "happy fall" card. I stamped the leaves in different colors, then went back over the green leaf with clear embossing powder, and the two oak leaves with broze embossing powder.
Thanks so much for looking! Have a great week!

Tuesday, September 20, 2011

Simple Card Designs

Hello! I'm back home after our travels last week. I even got all of the laundry done (and folded) already! Now I just need to get my house cleaned.

We've been away from home so much I still haven't had any time to get scrappy! I miss it so much. So, today I'm going to share a few more cards that I made recently. 

In case you are new to my blog, I use a lot of paper scraps for my cards. It's always fun when I find two unrelated scraps that look great together. I'm not sure of the paper line...That's the downside to using scraps, I guess.

The design is easy, dividing the card into four equal pieces with a thin space around and between each piece, rounding all of the corners. The sentiment is StampinUp! I used the SU scalloped punch around the sentiment and again to matt it in dark brown, offsetting it from the stamped layer. Then, I cut a larger scalloped circle with Cricut Accent Essentials.

Again, nothing fancy here. These are simple cards, with no embossing or special techniques. I like fancy techniques, but no time for that lately. I used the same paper, and the same sentiment. I punched a small hole in top and bottom of the sentiment and threaded the ribbon through it....easy!
Thanks for looking! Hope to be back with some fun scrappy layouts sometime soon!

Tuesday, September 6, 2011

Simple cards to share

I cropped this weekend and believe it or not, forgot to take my pictures. Not to worry, though. I spent the whole day making cards and getting back into the crafty groove. Thought I'd share a few with you today.

These are all made from scraps. I bought a pack of white cards and envelopes on sale recently. It's so nice to have these on hand for making a quick card. Then I just pull out my scrap file and see what's in there. =)

For the first card, I used a  SU sentiment, oval punch, and two scalloped punches to matt the sentiment. The black and white paper is CM.

I used the same papers here with another SU sentiment stamp and frame. I used the scalloped punch to punch it out and then another of the same size scallop punched in black, then offset it to give it some definition. The pink matt was cut with Cricut Accent Essentials at 1/4" larger than the scallop punch. I layed 3 strips of ribbon/twine under the paper on the right side before sticking it down, then tied each in a bow after sliding on the sentiment tag.

Basically the same idea here on the third card, but used three different patterned papers and attached the sentiment in the corner with foam dimensionals.

Thanks for stopping by my blog today. Enjoy your week!

Sunday, June 5, 2011

Father's day cards to share

While I was making my graduation cards, I  decided to go ahead and make Father's Day cards while I had my mess scattered around. Here's what I made.


The stamps are all brand new from Stampin Up! I had the paper in my stash. I cut the letters and the penants with my Cricut cartridge "Birthday Bash" and bakers twine to string it all up. If you look closely you will see the embossing on the sides created with VersaMark ink and clear embossing powder...an easy subtle effect.


I made a black style and a brown since we are blessed enough to still have both of our Dads!

Hope you're having a wonderful weekend. I'm personally not ready for Monday yet, but am very thankful for a good job that I love that helps to pay the bills and support my obsession...=)

Friday, June 3, 2011

More Graduation cards

Happy Friday! My dear friend and I are on our way to a weekend scrap retreat. We've had it on the calendar for months and it is finally here!! Before I leave, I wanted to get a quick post out to share some more graduation cards with you.

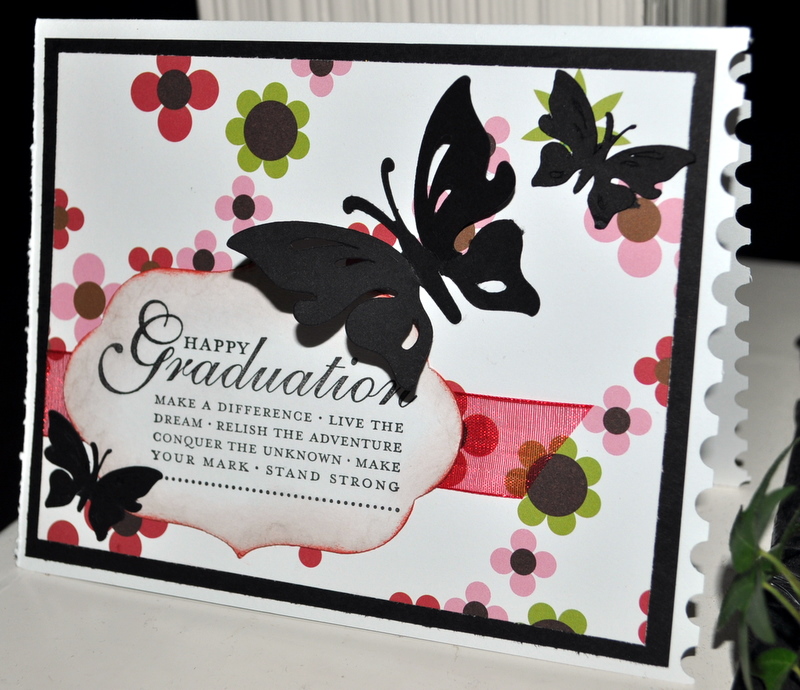
First, a few for the girl graduates. Loved the black butterflies!! These first three cards were inspired by cards I saw Splitcoaststampers. The sentiment is StampinUp! and patterned paper is some mysterious paper that I found in my stash...I love it when that happens...LOL. I used the postage stamp border punch on the edge for a little special detail. The butterfly is from the Indie cartridge (Cricut). I made four and I wish I had made more because I'd kind of like to keep one for myself. =)


This is so simple, but I love the way it turned out. The picture doesn't really do it justice. I used Coredinations cardstock in a very light pink, but it looks kind of gray here. Cut some black script paper with Plaintin Schoolbook cartridge as well as the adorable little flowers, and topped the flowers with tiny gemstones. Easy...so I made four of them for the speical young ladies that we know who are graduating this year.

I love the colors in this boys card! I used a lot of Kraft, black, and red. The map paper is Great Escapes from an 8x8 stack I found some time ago. I just sliced both of them in half and made four of this style of card. The sentiments are Tim Holtz. The cute little car is Graphically Speaking cartridge. I added "Class of 2011" by hand for some additional detail in the left corner. This was the first time I made an inside cut with my trimmer. It was pretty easily actually so I may keep this in mind and make more frames for my cards and layouts.  

These are sample thank you cards for my son to send after his party. I get inspired by logos and advertisements that I see and especially those combining fonts and numbers into an eye-catching design. I sat down and did this in WordArt in about 15 minutes. I don't pretend to be a designer, but I knew what I wanted and like the way it turned out. I was jumping up and down when I realized that my Creative Memories small square punch just happened to fit perfectly around the logo. I was able to easily frame it using the larger square punch and blue paper...very helpful when you're making multiples! The embossing folder is, of course, Tim Holtz! I have most of his new distress embossing folders and am a huge fan! 

Same idea here, but simpler. Only one layer and used a different (my favorite) Tim Holtz distress embossing folder right on the base of the card. Quicker and Jacob liked it the best...Lucky me! 

Come back Sunday for the Father's Day cards that I made! Have a wonderful weekend. Thanks for checking out my blog today!!!

Sunday, May 8, 2011

More cards!

Happy Mother's Day to all of you lovely ladies whose favorite name is "Mom". Actually my guys call me "Mama" even though they are all grown up now.

I've been on a bit of a card streak lately. For those of you who know me, I'm more of a scrapper than I am a card maker. I really enjoyed making all 3 of these and they didn't take me too long.

The first one is the card I made for my Mom for Mother's Day. I hope that she will enjoy all the bling. The butterfly was cut with the Indie cartridge (Cricut). The paper is KC Company.


This one was going to be a bridal shower card, but I believe it will end up being a wedding card....Long story...LOL. All I need to do is change the inside. I used the leftover pieces of paper from the card above. The bracket mat is cut with Sweethearts cart (Cricut). I sliced it (off center) then flipped the cut edges to the outside of the card so the bracket edges point towards each other. Make sense? From there, I just added flowers and other fun stuff. The stamps are StampinUp! "Bliss".


This last card is a birthday card for my husband's brother who rocks at guitar. This card came together so fast!!! The guitar and flourish is cut with Quarter Note cart (Cricut). I just happened to have a small piece left from a sheet of wood I've used on scrapbook layouts. It was the perfect size for this guitar!!! Actually everything came from my scrap box...love that! I also LOVE how the wood looks with the Ranger glossy accents painted on it. I let it dry over night. The sentiment stamp, is also StampinUp!

Thanks for stopping by! See you next week. Enjoy your day!

Monday, May 2, 2011

Birthday cards to share today

Thanks for stopping by my blog today. A few weeks ago I was able to get inspired to make a few birthday cards for friends and family. I thought I would share those with you today on this rainy Monday in Fort Wayne.

The dry embossing folder is Tim Holtz. I inked over the pale aqua paper with a couple different shades of ink to really bring out the texture of the dry embossing. The heart stamp is SU. I spritzed it to give it a frosty shine which is a little hard to see here. Then, added a couple of tiny pearls here and there.

This card is the same Tim Holtz embossing distress folder with the same inking method. However, I added a little bit of VersaMark here and there and sprinkled on some bronze embossing powder so it would cling and used the heat gun. The bird (SU) is also heat embossed with the bronze powder. I trimmed around it and popped it up. Using the same ribbon and papers, helped me speed up the process a little. I can sometimes get slowed down in the process of choosing the paper. When I find something that works together well, I try to at least use the remainder of the paper and make up another card while I've got it out.

This last one is my favorite. My nephew had a birthday, and I thought it would be nice to come up with a "guy" card for him. The emobssing folder is from Tim Holtz. I've been dying to use this folder for a few monthsand hadn't come up with anything until now. I was pretty excited with the way it turned out. The sunburst look is pretty trendy right now. I've noticed it in a lot of advertisements and brochures. I tend to see a scrapbook page or card in almost everything I see...Guess that's where I draw my inspiration. The patterned paper is theTeen Angst collection. Just  a little corner of it to grunge it up a little. The silver metallic dots helped finish it off nicely. Hope he liked it!

Thanks for stopping by! Have a lovely evening!!

Thursday, February 17, 2011

Hope you are all having a good day. We briefly hit 60 degrees here in Fort Wayne today....Pretty nice. It may not last long, but it's a taste of what's to come.

I'm sitting here at my desk after the long work day and I just couldn't wait to get into my blog and post something. Yes, I'm a little obsessed, but in a good crafty way.

Sonia of Archiving Angel was recently asking for fellow bloggers to make cards for the military. She is a military wife and wanted to bless the soldiers there along with her husband. So I made a few and sent them off to her. I hope these will express a little bit of encouragement and gratitude for their daily sacrifce for our freedom.


I'm off to a mini scrapping retreat tomorrow and I just can't wait. Have a great weekend and enjoy whatever you do.

Sunday, January 16, 2011

A few cards to share

I actually pulled off the big surprise party for my husband's 50th! He was pleasantly surprised by a house full of friends and family Thursday night after we came back from his birthday dinner. He's pretty observant about everything going on around him. To make matters worse, I talk about every detail going through my brain, but I didn't let anything slip!! We had a great weekend with his sister, brother-in-law, father, nephew, and our kids. There will be many great scrappy opportunities later on from these pics too. =)

It's time to post something...I do have a few cards that I've made in the last couple of months. Hope these inspire you in some way!

The first one is a birthday card for a friend of ours who also turned 50 recently.

This is a graduation card I made for my brother who recently graduated with a degree in health administration.

Wednesday, October 6, 2010

Girly birthday cards

Happy Wednesday! Where is the week and the year going? Sorry for the delay in posting anything new. It's been crazy, but I have a few cards to show you today.

This first card is for my Mom's birthday. It was a quicky. I actually had the bird and the cage on hand in my stash. They were an Archiver's make and take several months back. My Mom loves birds so I was saving it for her. The sentiment, patterned paper, and punch is from Stampin Up. I decorated the inside with a little strip of the same patterned paper.
This card is one for my BSBFF (best scrap booking friend forever) LOL! She is my stamping mentor (Don't look too close!) and the Queen of Color when we scrap together. The two bottom layers of the flower are punched with SU flower punch and the top layer is the heart flower from Sweethearts Cricut cartridge. I loved the "J" brad. I had the whole alphabet of these silver brads given to me as a birthday gift recently. Thanks, Dina!! I used the same SU punch shown on above card as the bottom turquoise layer under the sentiment here. I also used the bracket border punch along the edges with a little bit of inking for definition.
Thanks for looking! Enjoy your day!

Wednesday, September 22, 2010

Birthday cards for the guys!

Time for some scrappy birthday cards...
This one is for my brother (my only sibling). He is a bird and nature lover, so I hope he likes it. This one is made totally from scraps.
This favorite of mine is for my younger son Jacob who just turned 18. He is an avid bicyclist. He's been really busy with soccer and school lately, but give him some free time and he's off! I used my markers to color in the stamps (Stampin Up). He liked it a lot!This one is for my oldest son who just turned 20. They actually share the same birthday!!! He loves to play the guitar. He was impressed with this card and is proudly displaying it in his really cool man cave where he plays his music. Background stamps are again from Stampin Up. The guitar is cut with my Cricut (Indie cartridge).

Thanks for visiting my blog! Enjoy!

Wednesday, August 18, 2010

More cards to share

Hello friends! Happy Wednsday. I have some more cards to share with you today so I'll get right to it.

This first one is my favorite of the three. It was designed for my parents 56th anniversary!! I don't know if I shared before that my son Joel was married on their anniversary on August 7. So while I was making the wedding card, I was making an anniversary card for my parents. Kind of special, right?? I love that they will share their anniversaries. Anyway, back to the card....Everything was cut with my Cricut machine "Sweethearts" cartridge. All of the layers are included and cut to size. I sprayed the nest with brown smooch spray to give it a dirty, sparkly look. The red heart has some flocking. This was my 2nd attempt using flocking. First time was not as cute. =)

This one is a sympathy card for my son's girlfriend who lost her Grandmother. I used a sketch from "Clean and Simple" blog. The tree is a Stampin Up stamp.
The last one is really the same sketch I used for the sympathy card, except this one is a baby girl card. It was quick and easy.
Thanks for looking. I appreciate all of the great comments I've received on my blog lately!!! It's always nice to know that somebody is inspired!

Monday, August 16, 2010

Never-ending Cards

This is the other card we made at stamp club the other night. It's a card you can keep opening and opening. There are 4 different looks. (Paper and stamps in this first example are all Stampin Up.)

This is the front of the card.

Open from the center to the left and right for this page.

Open again from center to the top and bottom for page 3

Here's the final page...If you open it one more time you are back to the beginning.
I wanted to make an extra special card for Joel and Cindy's wedding. Nothing better than a never-ending card for a wedding, right? Here's the card I made for them. I love the way it turned out. It is 6" x 6" so I borrowed a clear envelope from a friend and attached it to their wedding present.


The bridal stamp set (I used almost everything in this collection) is from Stampin Up! Nope...I don't sell Stampin Up...just like a lot of their product!