Showing posts with label faux stitching. Show all posts

Tuesday, May 14, 2024

Happy Birthday Bro - One Page Layout

 I thought I'd take a quick break from posting my Grand Tetons layouts. Here's one from several years back that I've never postged. Note: My youngest has since cut his hair and beard...lol...way better now! 

We met the boys for a quick birthday lunch at Taco Bell!!!! Too funny, but we knew we could all step away from our work day long enough to be together on their birthday! We celebrated it again on another day so the spouses and grandkids could join.

Yes, they are birthday brothers! Two years apart, but both share the same date of birth. I'd like to take the credit for that, because I think it is so fun that they share their special days. But you know, they decide when they'll make their entrance in the world, with absolutely nothing Mom can do about it. 

I used several different scraps on the page and layered them up as a backdrop to the picture. I took my cue from the wall mural in the photo and used those colors. I added three different types of washi (love the mustaches!) and a vintage looking happy birthday image from Design Space, along with strip journaling. The white Jelly Roll pen is a great way to add quick faux stitching. I used baker's twine for the bow in the upper right corner and my old revolving date stamp on a ticket to mark the year.
Here's a closeup so you can more easily see most of the details.

Thanks for stopping by!! Enjoy your week and be crafty!


Wednesday, October 6, 2021

Covered Bridge - Two Page Scrapbook Layout

 Here's another layout of a fun day of one-on-one time with our one and only grandson. We had a lot of fun showing him some sights and just being together.

Yes, the paper has some flowers, but that is okay! I loved the colors of the leaves with the pictures. The rich red really jumps out at me. The little circle letter stickers are perfect for a quick sub-title telling more of the story. I know, without that, I would look at this layout and ask my self, "Where was this bridge"? I don't have a brain for remembering these types of details. 

Papa and his favorite boy! I love watching them together. Aren't they sweet? On the right side, I layered up a couple of journaling cards and tied them together with black and white baker's twine. I also faux stitched the edges of the cardstock to echo the stems of the leaves. Sometimes it's the little details that pull things together.

This is a super simple page, but I am very happy with the way it turned out. Hope you like it! Have a great week!! 

Friday, October 26, 2018

Two Page Scrapbook Layout - "Legacy of Love"

Here is my final layout of our fall family shoot of 2015. It's the whole crazy, beautiful family!
 The stitching is just drawn on...I don't have a sewing machine, but it's pretty hard to tell that it's drawn on once you get the layout in the page protector, right? Again, I've used washi tape, a border punch along the edges, and a few punches to layer up a small flower circle embellishment.
 I love this crazy bunch of people! They bring so much love and light into my life. We struggle and we fuss over issues sometimes, just like every family does, but we stick together like glue through it all.
 Here's a close up of my faux stitching....Not perfect, but I think it adds a lot to this layout.
So now you've seen them all.😲 Thanks for hanging in there with me and looking at some of the same pics in multiple layouts. Some layouts were for my grandchildren's books and some for our own.

Next up will be a few Halloween layouts.  See you soon!

Tuesday, October 23, 2018

Two Page Scrapbook Layout - "Little Lady" and "Little Man"

I just returned from a weekend scrapbook retreat! I got quite a bit done, and I can't wait to show you them! I brought home a cruddy cold with me. Mucinex, Cold Eeze and Kleenex are my besties right now.

Before I share my newer layouts, I still have more layouts from our fall photo shoot (2015) to share with you. This two pager features my two grandbabies! They're the cutest in all the land...
 You know me...I love to mix up patterned paper, and this layout is no different. I am happy with how it turned out. Too crazy for you?
 Couldn't resist adding the deer paperclip. How cute is this?

Saturday, September 1, 2018

Two Page Layout - "Dream Big Little One"

A few days ago I posted one of my least favorite layouts. Well this is one that I love!! The paper, the colors, and especially my cutie pie grandson!! 😻
 If you stop by my blog often, you may recognize the pictures. I am working on a separate scrapbook for each of my grandkids, in addition to scrapping some of the same photos in our family book. So...twice the cuteness!
 Sometimes I lay the pictures out the same and just use different paper. Other times I completely recreate the layout the second time around.
 My favorite part of this is the paper airplane. Super simple, but it totally makes the page for me and made a great place to journal.
Thanks for stopping by my blog today! Hope your day is full of crafty fun!

Monday, November 3, 2014

Two Page Layout - "Oink Oink"

Halloween 2013

Last year Halloween was pretty rainy and dreary as you can see from my hair in these pictures. We still got out to see the cutest little piggy, EVER!
 This is a super simple layout with six 4x6 pictures going across the page. I love pink and orange together, especially when scrapbooking a furry hot pink piggy! We got her a cute board book and she enjoyed looking through it and hearing Grandma bark like a dog. Who wouldn't, right? The cutesy little pig embellishment was cut with my Cricut and adorned with light pink ball fringe around the collar, and glitter on her cheeks.
 Halloween has now come and gone again. I can't get over how fast time flies. It's totally crazy...I wish I could slow it down sometimes. These years are so precious!

This year (2014) we had fun trick-or-treating with our grandkids in our neighborhood. Scarlet is two and a half years old now. She was an adorable owl!! She went to the door, knocked, said trick or treat, said thank you, and then echoed the homeowner and said "your welcome"....Great fun! Our grandson is 6 months old and he was a tough little pirate, complete with drool, smiles, and lots of wiggles. It was the coldest evening we've had so far, so we only went a block or two, but we made memories! I guess you'll have to come back next year to see the scrapbook pages for 2014 Halloween, but I'll give you a little teaser...
We are blessed to have our sweet grandbabies so close! =)

Saturday, October 18, 2014

Two Double Layouts - "Country Girl" and "Good Times"

Birthday celebrations are the best!! My sons share the same birth date in August, so we almost always find a way to celebrate the day as a family.
 This year, we made the short trip to Muncie to celebrate on Jacob's turf at Ball State. Cammack Station is one of the local hamburger joints with a vintage vibe and yummy food. There were a bunch of tractors on display across the street, so we took our turn posing on them and letting Scarlet turn the steering wheel.
 We got some great shots, even though she wasn't especially smiley that night. She's so adorable with or without the smile. The patterned paper and chipboard embellishments are Echo Park's "This & That". The banner is cut with Art Philosophy and SU's bitty bracket punch.
 These pictures bring back so many memories from the boys' birthday last year. It's always a hoot with this family!
 These pictures were taken inside the restaurant. The patterned paper from SU fit the vibrant vintage theme of the restaurant perfectly. The title is cut with Cricut's "Paislee" with an orange block out shadow.
 The Studio Calico wood grain circle banner just happened to be lurking in my stash. I love it when that happens. I cut the bracket map with Art Philosophy and sliced it in half to use on each side of the collage of photos. The Chevrons were punched out and faux stitched with a fine marker.
I hope your week is blessed and filled with fun family times.

Tuesday, May 27, 2014

Two Page Layout - "Stick Maze"


 Everybody loves vacation! I have several layouts to share from our family vacation to Florida last May. We stopped for lunch in Kentucky. I love it when we fall upon something fun to see or do with just a random stop for lunch.
This stick maze was pretty cool. it was big enough to walk through. You can see the size of it in the top left picture.

The title font is from Cricut's Life is a Beach cartridge. I edged it with a white Jelly Roll pen to give it a stitched look like the paper matt used on the right side. The journaling block is Doodlebug Design.
 I didn't make a note of the brand name of this fun flowered chalkboard matt, but the white stitching and flowers gave me the inspiration for the rest of the page. I cut layered flowers with my Straight from the Nest cartridge and punched a small green circle for the centers. As I look at it now, I think I would have liked it better if each of my flowers were matted in black. Apparently, I never stop critiquing my projects.
The stick maze was probably a temporary exhibit at the arboretum, but it's still a great place to stop for lunch, for sure! The flowers were amazing and the artsy hand was a great prop for pictures.

I'll be posting more layouts from our St. Augustine, Florida, family vacation in the next few weeks. Thanks for stopping by today!!

Saturday, May 5, 2012

Two double layuots - "Around Town" and "Miracle"

Happy National Scrapbook Day!!! I wish I were scrapping, but hopefully soon! Thought I'd better at least take time to post something. =)

This is another layout of Lake Placid, NY. We were there last fall and I'm still working on cranking out the pages. We took so many pictures. I'm trying to only scrap the best, but still have a lot to work on.

I had lots of fun with circles and faux stitching. The base is Little Yellow Bicycle's "Twig". All of the circles came from my scrap box, Cloud 9 Design, Deja Views, and more. I lined up the photos on a matt edged with the Fiskars postage stamp border punch.

The circles are made with SU 2.5" circle punch. I used journalling strips and inked the edges with T. Holtz pumice distressing ink.
The title font is from Cricut Cake's Birthday Cake cartridge.

Do you remember the 1980 winter Olympic games when the US defeated Russia for the gold medal in hockey? Okay, so I'm not a hockey fan at all, but those olympic games are a huge part of Lake Placid's claim to fame. You should check out the movie made about it called "Miracle on Ice". These pictures were taken at the arena where it all happened.
The paper is Coredinations and Paper Studio. I opted for letter stickers from The Paper Studio for the title. I matted the photos with two different colors of gray. The fun 3D looking star accent is from the Art Philosophy cartridge.
It's extremely rare for me to not use any patterned paper on a page. I wasn't even thinking about it at the time, but sure enough, there is none to be found. =) It lets the multiple pictures (9!!) shine through and be the stars of the page.
Thanks for stopping by my blog today! Enjoy your weekend!!


Thursday, December 8, 2011

Double layout - "Prom"


Time sure flies...more than a week since I've posted? How is that possible?

I recently found this layout which I'd forgotten to share previously. I've posted other prom layouts, but somehow, overlooked this one. There were a bunch of extra pictures after putting together the layout for my son's scrapbook, so I decided to make one for the family book too!

Sometimes I use sketches to get me started on a layout. This one is from PageMaps.
Just about everything you see here is Cloud 9 Design, Cocoa Mint. It's hard to see it here but some of the flowers on the patterned cardstock are embossed and shiny. I used a thin marker to create faux stitching for the flower stems and leaves.

The white scallop border is from Cricut's Accent Essentials. I also added a border of punched scalloped circles cut in half.  

Thanks for stopping by today.

Monday, February 7, 2011

"Enjoy the Ride"

We have a foot of snow on the ground! It's very pretty, and very cold outside. Anybody else ready for spring? I'm certainly getting there.

I've had some busy scrap time lately and it's time to share something new here. Have you ever scrapped, complete with journalling, only to find out later from your family that the story you journalled is all wrong? Well it's a little embarrassing, and I still haven't fixed it. I thought these pictures were all taken on the same day, but it turns out they were not. In fact, I journalled that these were sunset pictures, when, in fact....they were sunrise pictures captured on the way to work. How could I forget that? Oh well, not a big deal to scrap them together, but I definitely need to fix the journalling. Ugh!  The rest of the pictures were taken when my son got his new (to him) vehicle and he took us for a ltitle joy ride. One of those memorable, spontaneous events.

I will probably have to fix the journalling by adding a strip of white paper over the top of the old. I may even type it out....Not sure yet. Since you all probably don't care so much about the journalling anyway, I will share the layout with you before fixing it.

Left:

Right: 

Together: 

The papers are all from Cloud 9 Design. This is a new pack I just picked up on sale. Aren't the colors yummy?  The sketch is from Julie Bonner, although I deviated quite a bit so that I could use 8 pictures instead of four. Most of the dietcuts are from Cricut's "Graphically Speaking" cartridge.  I love the faux stitching because sometimes you just need to get it done fast.

Have a wonderful day!

Thursday, January 6, 2011

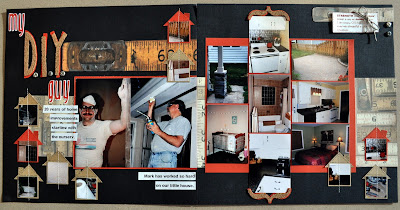
My D.I.Y Guy

Wow! Posting two days in a row here. =)

Thought I'd share this layout on my own blog since it was posted today on Multi-photo Scrapbooking blog!! I love this blog because they feature multi-picture layouts from scrappers who want to upload and share their work. Check them out, be inspired, and think about participating in some of their challenges.

So here is one of my favorite layouts that I have been saving for the right moment! I love it because it features my one and only husband who has worked so hard on our little house over the past 20 years. We (meaning "he") only have a few more things to do and then we will sell it and try to find something just a little bit bigger...I need a scrap room! LOL!

Left side shares a 20 year olf photo (left) of him working on nursery for Joel which was our first project, and the picture on the right was taken this summer working on exterior painting.

Right side is here. I should have grabbed a picture of the dining room because he totally renovated that as well. It's a beautiful gold color with wainscoating and lots of beautiful white woodworking. I know...How could I forget that, right? I'll have to point it out in a future layout. 

Here they are together (Recipe below) 

My DIY Guy turns 50 years old next week!!! Happy Birthday "Old Man"!!! I love you more than ever!

Recipe:
Sketch:  Left side from Page Maps; Right side is my own
Paper:  Die Cuts With a View black cardstock, Tim Holz antique measurig tapes
Accents:  Srew top brads, machine stitching, "Strength" definition done in various fonts on word processor, Photos in little houses cut with square CM punch, Roofs same square punch, but cut the square diagonally into triangles, faux stitching on roof tops done with black fine tip marker, DIY title cut from sheet of cork using Cricut, and journalling with label maker

Wednesday, August 25, 2010

Baseball - 2 double layouts

My son, Jacob, played baseball for the first time this year. He didn't get a lot of playing time, but he was happy to be on the team and with his friends. Keystone was such a small school and a lot like a family in so many ways.

This layout includes some random photos taken during the season. It shows some pitching sequences too. I embellished it with a handsewn mitt cut from the Sports Mania Cricut cartridge. I hand-stitched along the pocket of the glove with embroidery floss and I was pretty happy with the way it turned out. I also used some distress ink to get it the color I wanted. (Double click on the photos to enlarge.)
This one is my favorite of the two baseball layouts. Most of the random shots are from the end of the season baseball picnic at the coaches house. Of course, the kids are being silly and that why I love it! The other side features the individual and team professional photos. I cut the 8 x 10 size memory mate photo in half so I could put the title in the middle. I drew attention to my favorite photos with the red matting.
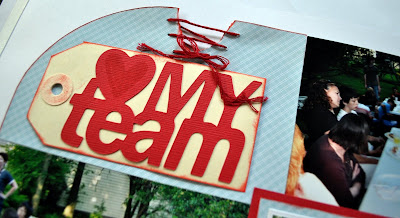
Here's a close up of my faux stitching down the right hand side. I used the piercing tool and then a pen to draw the fake stitching between the holes.

I used real stitches to stitch up the tear on the upper left. This page is just so symbolic to me. I've mentioned on the blog before that the school closed due to lack of financing and it just tore everybody up and left a hole in our hearts....hence the stitching. We tried really hard and raised a lot of money, but it just wasn't enough....

Enjoy and be inspired to scrap your memories too!