Showing posts with label wedding. Show all posts

Saturday, January 30, 2016

Two Page Scrapbook Layout - "So Fancy"

Happy Saturday!

Who doesn't love a great wedding. Here's a layout of a family member's wedding. It's such a great photo op when we're all dressed up and in the same place at the same time! :)
 Look at the beautiful humans that I love!
 The polka dot is actually gold foil. I used vellum and gold layers for the flower (SU 5 petal flower punch).
Thanks for stopping by my blog today!!

Monday, July 7, 2014

Two page Layout - "Mr & Mrs"

It's the time of year when two shall become one!! It's so fun to witness a couple taking that leap of faith and promising to love each other forever. It's such a huge step and certainly not one to be taken lightly. Every time I attend a wedding, I'm freshly reminded of the promises my husband and I made to each other almost 29 years ago. Man...how time flies!

This layout is from a beautiful outdoor wedding that my family attended last year. The yellow/gray color combination was so bright and cheery!
 What a sweet couple! It was a very memorable and beautiful wedding.
My flower punches came in handy for layering gray and white flowers and, of course, securing them in the middle with a jeweled brad added some bling.
 The banner is made with Tim Holtz tape doubled over white scrappers floss and hand cutting the point.
Yesterday, we attended a beautiful indoor wedding and I took so many great pictures that I'm looking forward to scrapping. My 2 year old granddaughter was the flower girl...So adorable!!

Hope you have the opportunity to enjoy a beautiful sunny wedding with loved ones this summer. LOVE is definitely in the air and one of my favorite topics to scrap about. =)

Thursday, October 27, 2011

Vintage Wedding Album - FINISHED!

I had such a great time scrapping this past weekend. Always great to getaway and enjoy some friends, and get some layouts done!!! I can't wait to share them. One of the things I finished up was the album of my parents wedding photos. If you haven't seen the past layouts, you can see all of them here.

 Here's the remainder of the double layouts. Hope you enjoy checking out these old photos! You can click on any of these pictures and it will enlarge for you, then just hit your back button to come back. I tried to keep them fairly simple so the project wouldn't overwhelm me, and so that the photos would be the center of attention.


I really enjoyed this project and felt honored to do this for my parents. They are such great people. They are still together after all these years....unfortunately, they are both dealing with some health issues, but I'm praying to have them around to see lots of great grandchildren!

Tuesday, September 13, 2011

Two double Scrapbook layouts - Vintage Wedding

Hello! Hope you are all doing well today. I'm in upstate New York getting some continuing education credits for my daytime paying job. It sure is beautiful here! We're in Lake Placid in the Adirondacks. Perfect weather. I'm so glad my hubby can be here with me enjoying some time away from the grind.

Today, I have a few more vintage wedding layouts to share with you. I took it upon myself to redo my parents' original wedding album because it was fallling apart. They have now been married 56 years. Quite an accomplishment in this day and age!! They have stuck it out through thick and thin and especially through long term health issues. I love them dearly and am proud of the heritage they have given to me and my family.

So I will admit I missed the mark on this page. =( All the way through on this album, I've been using black for the title, and I didn't do it here....Not sure what I was thinking, but after seeing it here, I will be redoing it in black. It just doesn't pop off th epage the way that it should.

The hearts were cut with my Cricut and the Sweethearts cartridge. The color is just enough darker that it shows up fine. I used the photo matt to journal some details. 

Here are the two pages together. I'm definitely going to fix the title on the left. I guess sometimes you can't see an error until you photograph and post it. LOL!  Also, I think some of the pictures I found were not the best shot. of the two of them. I used some of the better ones previously in their 50th anniversary album. But, I love these shots anyway and they were too good to just let deteriorate and turn yellow. 

Here's another layout of them walking back down the aisle after they became man and wife. Aren't they cute? I used the Stampin Up triple flower punch for all of the flowers on this page. I layered them up and topped each one with a pale blue pearl gemstone. Again, I went back to the black title (yay me!) and cut it with Quarter Note cartridge. I used my Fiskars border punch on some tone on tone patterned blue paper to edge the photograph.

Here they are with their first bite of cake.  

I scattered the flowers from top left diagonally down to the bottom right on this one. I like how it seems to draw the eye across the layout.

Thanks for stopping by today. Enjoy your week! Be sure and leave me a comment. I love to hear from you!

Monday, August 29, 2011

Double double vintage wedding layout - "Family" and "The Bridal Party"

Hello! Happy Monday, if there is such a thing. =) My heart goes out to you east coast followers who may have experienced storm damage and/or power outages. Wow! The U.S. has definitely had their share of natural disasters this year! My thoughts are with you.

With my father-in-law's death and my son off to college, my husband and I are still trying to find our new normal. I've had zero time to scrapbook lately. What a whirlwind of emotions and activity!

I want to take a few minutes, though, to post another vintage wedding layout. Still working on my parents' wedding photos. I really hope to be able to work on it again soon!

Left side pictures my Mom's parents. I like the way the flowers match the matting and really help the picture pop.

Right side pics are my Dad's parents. The blue base of the flowers is punched with a SU punch and the store bought flowers are layered on the top with a pearlized blue gem for the center of the flower. The leaves are hand cut and inked around the edges.  

I like the way it turned out. It's difficult to deal with all black and whites, but throwing in bursts of color seems to help. The title again is cut with the Cricut Quarter Note cartridge.

 The second layout is the bridesmaids. The newspaper article that my Mom saved described the wedding in great detail. It's been really helpful picturing the colors in my mind. I journaled arouond the yellow matting, describing the colors the bridesmaids wore. The bridesmaids on the left are my Mom's sisters, and her maid of honor is actually her then future sister-in-law. I thought that was interesting, but most likely she chose my Dad's sister so she didn't have to choose between her own 3 sisters for a maid of honor.

Her colors were all pastel. I used some small polka-dot ribbon with the same pastels and gathered it up a little on one end. The flowers are punched with the SU three flower punch and topped with a tiny gemstone. 

The title which is split between the pages is also from Cricut's Quarter Note. 

Thanks for stopping by. Blessings to each of you!

Tuesday, August 16, 2011

Vintage Wedding Double Scrapbook Layout

We are home from work today helping my son pack up for the big day tomorrow. He'll be heading off for his Freshman year at Ball State University. He is pretty excited and nervous. We feel the same way...torn between excitement for him, and beginning to feel lost without him. However, we are very proud of him and will soon settle into this next phase of life...empty nest!

Now that I'm feeling all sentimental, it is the perfect time to share the first few pages of a new project. When we cleaned out my parents' condo, I found their wedding album and it pretty much fell apart in my hands. So, I brought all of their 8 x 10 original wedding photographs home with me. The goal is to preserve them, and I feel the best way to do that is to get them into a photo safe album that will hopefully last even longer than the first one. In order to have the pictures available for reprint, I first scanned each one and saved them in a separate folder (and backed them up). Then, came the fun part where I could get a little creative.

Here is the first page of the album. The flowers are from a tube that I purchased quite awhile back. I like their vintage look. I used some paper punched flowers to add to the centers and pick up the pastels of their wedding colors. The swirls are cut from with the Sweethearts Cricut cartridge. I like the soft tone-on-tones paper together with the newsprint.

The base paper for all of my layouts is from StampinUp. The entire pack is full of 4 different variations of newsprints. I thought it was perfect because of the faded, yellow look in the pictures. Neither black nor white seemed to work for me. I like the look of the newsprint, and I think that my parents will too. They have a pretty laid back, eclectic, casual and simple style. All of the photos are black and white or should I say cream and gray now that they've faded quite a bit. I found a newspaper article that described the pastel colors of the bridesmades dresses and the flowers, so my color scheme will match. 

I love how thre black titling really pops. I will use this throughout the album to help tie it all together. The font is from Quarter Note cricut cartridge. The flowers are handmade using layers of scalloped scircles. After punching them out I wadded each one up individually and then layered 3 together to give it depth. The other smaller flowers are created with a SU punch that cuts 3 different types of small flowers at the same time. I used these as centers of the larger flowers and added a gemstone for the very center. There won't be much journalling in the album, but I did add a description here of my Mother's wedding gown. All of this information came from the same article in the newspaper. I'm so glad that she saved that article because it really made these old photographs come alive for me. I typed out the description and printed it on cardstock using my commputer printer. I then matted it to match the photos on the page.  

Here are the two pages together.  

Thanks for stopping by....You'll be seeing more of these layouts really soon. It's been such a fun project so far. I've finished about 3/4 of the project already! Can't wait to finish it up. Scrappin time has been minimal lately....sad face.

Monday, October 18, 2010

Last photos of the wedding album for Gramma

Here is the last set of pages for the 8 x 8 mini album I did for my Mom. It was such a thrill to have my parents there and it meant so muh to Joel and Cindy. A huge thanks to my big bro and SIL for getting her there! I almost hated to give the album away because I had so much fun putting it together for her.


Saturday, October 9, 2010

8x8 wedding album for Gramma - (1st post)

I am so excited to share the gift album that I made for my Mom for her birthday!! I quick snapped photos of it before rushing off to mail it to her! She will be so excited!! I should have taken the plastic cover off for the photo, but I didn't want to get it dirty, so try to ignore the shiny areas around the edges. It was so hard to decide which picture to put in the front, because they were all so great!
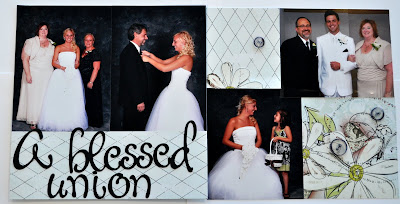
I especially love these photos of Cindy. I was so excited to go along when she picked out her dress. She is just gorgeous isn't she?? I used my brand new Cuddlebug to put the swiss dot emobbssing on the title tag. I wish I could tell you the name of this paper, but I don't remember. I try to write all of that down on the back of my layouts, but...alas I did not because I was in such a hurry! LOL!

Again, the mystery paper...The whimsical flower pattern is on the flip side of the diamond shapes. Beautiful... and I thought it worked so well with the professional backdrop used in the pictures.I believe you can double click on the pictures to make them bigger so you can see us all. Cindy's Mom and Dad, me and my hubs with Joel,and Cindy with her "cute as a button" second cousin who was the lovely flower girl...Speaking of buttons, I used clear ones with black Sharpie marker around the edge for emphasis. I thought it added to the whimsical look of the paper. I cut half a flower from the scrap paper and tucked it under the top edge of the photo with the flower girl.
Here we have the good looking groomsmen. My son, Jacob, is one of them and he is the one in the photo with Joel shaking his hand....surprised they weren't wrestling around, but I guess when you dress them up, they can act all grown up! LOL! The groomsman on the far left is Cindy's brother, and the other two on either side of Jacob are friends of Joel's. I loved the Minds Eye Bohemian paper with the colors of the wedding (green and brown). The picture of Cindy high-fiving her maids of honor is one of my favorites!!! Good friends and a great day!!

The pictures from the ceremony were screaming for purples, pinks, and greens...I just could not bring myself to follow a theme throughout the book and use the same papers and styles from page to page. I had to use what looked the best with the pictures and it adds some variety as you page through the album. The Ceremony was absolutely beautiful and the flower petals lining the aisle were my inspiraion for the petals lining the pictures on this page. I cut these on my Cricut in white and then inked the edges with green, and added a ltitle green glitter glue for the center. By the way... I only cried a little bit, and it was when their friend, Nate, sang his solo! He did such a great job it brought tears to my eyes as music often does. It was a very happy day!!

Check back this week and I will be posting the remainder of the album in two more segments. I hope it inspires you. I had such a great time putting it together!!

8 x 8 wedding album for Gramma - 2nd of 3 posts

Here is the second post with pictures from the 8x8 wedding album for my Mom. The wedding was absolutely beautiful! Cindy put all of the details together so perfectly for their special day! We all had such a great time. I still can't believe my son is married and that I'm now blessed with a daughter-in-law. Notice the pretty pink Stampin Up felt flower on the first page. =)
So excited to have some my Mom and Dad at the wedding and had to feature their photos in the layout. I know it was a HUGE day for my parents, with their first of 2 grandkids getting married!
Here is a closeup of the layered flower. I put this together with a bunch of different items that I had in my stash. Stick pin, white doilie, fabric leaves, and the large vintage patterned flower are from a prize package that I won some time back from Paper Secrets. I had never used a stick pin, but I LOVE it here! The green and brown paper flower was punched and crumpled and inked with brown on the edges. The buttons were from my stash and I used some light olive ink on the plain white flower petals to add more definition.
Their cake was beautiful and it tasted so good! REAL frosting!!! Yay! The flowers draped around and down th cake were beautiful!

Monday, August 16, 2010

Never-ending Cards

This is the other card we made at stamp club the other night. It's a card you can keep opening and opening. There are 4 different looks. (Paper and stamps in this first example are all Stampin Up.)

This is the front of the card.

Open from the center to the left and right for this page.

Open again from center to the top and bottom for page 3

Here's the final page...If you open it one more time you are back to the beginning.
I wanted to make an extra special card for Joel and Cindy's wedding. Nothing better than a never-ending card for a wedding, right? Here's the card I made for them. I love the way it turned out. It is 6" x 6" so I borrowed a clear envelope from a friend and attached it to their wedding present.


The bridal stamp set (I used almost everything in this collection) is from Stampin Up! Nope...I don't sell Stampin Up...just like a lot of their product!