Showing posts with label Sweethearts. Show all posts

Tuesday, February 14, 2023

Richard Marx - One Page Scrapbook Layout

 We don't normally do much for Valentine's Day. Guess we just prefer to stay in, especially when it's chilly outside. But a few years back, my sweet Hubby treated me to a Richard Marx contest right here in town. It was so much fun!! He puts on a great show and, of course, I LOVE his music. It was a great evening together. 

This beautiful paper is so pretty!! Full of pink, red, lacey doilies and all things L.O.V.E. I didn't need to add very much, except my pictures and some journaling. I matted the photos in gray, and double matted the photo of me and my Hubs. I wish I would have used my Cricut to journal, but it's at least legible! Why didn't I wear red or pink? 💕

Hope you enjoy your Valentine's Day with those you love! Have a great week!

Thursday, August 8, 2013

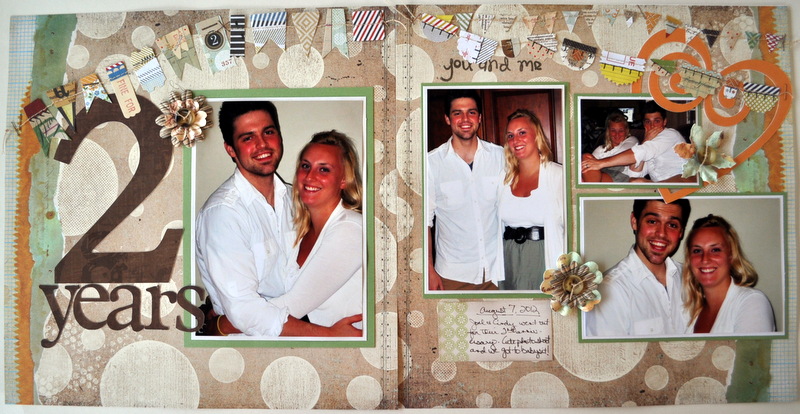
Two double layouts - "2 Years" and "We Love our Charlie"

Where does the time go? My oldest son and beautiful daughter-in-law just celebrated their 3rd wedding anniversary, and my youngest son is heading off for his Junior year in college! Time just keeps flying along, doesn't it?

In honor of my great kids, I have a couple of layouts to share with you today. First up, is a two page layout featuring pictures of my son and daughter-in-law a year ago on their 2nd anniversary.
 Aren't they cute! We are so proud of them! The patterned paper and paper banner are Basic Grey's "Clippings" and Little Yellow Bicycle. My scrappy friend got me this collection for my birthday and I've had a lot of fun with it. I adore the banners!!
 The title is Cricut's "Plantin Schoolbook" (an oldie but a goodie) and the heart is from "Sweethearts". I love these kids and their goofiness.
In honor of my youngest going back to BSU, here's a layout of pictures from the football game on parent weekend last October. Isn't he cute?? He's the tall one with the great teeth!
I had a lot of great pictures to fit on these pages, so I kept it simple with black and red matting, a few embellishments like the red washi tape, and a little snip-it of ribbon. It was breast cancer awareness week, so I added a little dash of pink since there was so much of it in the photos.
 As always, family weekend and the football game were tons of fun. I'm sure we'll be down there again this year snapping more photos.
Here are the two pages together! Go Cardinals..."Chirp-Chirp"!
Thanks for stopping by my blog today! Have a great weekend!!

Monday, December 19, 2011

Christmas Cards

Merry Christmas week to everybody! Are you ready to celebrate?? I'm getting a little bit more done every day. I can't wait!!
I was not able to make all of my Christmas cards this year, but I did crank out some multiples of a couple of designs. They are so much fun to make, but always more time consuming than it seems like they should be. =)

This card was inspired by a design for an invitation that I saw recently.
Most of the patterned paper is My Minds Eye, Laundry Line. It's all glittery and shiny! Perfect for standout trees. The sentiment is from Technique Tuesday. I splurged on theTPC Studios metal accents with glitter. =) Love the way they added some additional bling to my card.

The second card was inspired by Scrapbooks, Etc. I used a couple of different kinds of scrap paper. These are both from Echo Park.
 
I added a dry embossed background and used glitter paper for my snowflakes, along with the remaining TPC Studio metal snowflakes used on the previously shown card. The sentiment is one I got on clearance last year from Michaels.
And last, but not least is my own design. I was inspired by a tee-shirt! Do you ever get weird inspirations like that? It happens to me regularly, but I don't always have time to follow through on the idea.
Obviously, a very non-traditional color scheme, but I think it worked nicely with the retro look I was going for. I used glitter paper for the dove, which was cut from Sweethearts cartridge (Cricut). The peace symbol stamps are Inkadinkadoo and heat embossed with holographic embossing powder. The retro "peace" sentiment is Close to My Heart. I sponged some pink and green ink around the embossed peace symbols.

Thanks so much for stopping by today! I just noticed on my blog stats page that I have surpassed 10,000 page views on my blog!!! Wow! Thanks for all of the views. I believe this deserves a nice giveaway after the holidays!!! =) Hmmmm.... What shall I give away?

Thursday, October 27, 2011

Vintage Wedding Album - FINISHED!

I had such a great time scrapping this past weekend. Always great to getaway and enjoy some friends, and get some layouts done!!! I can't wait to share them. One of the things I finished up was the album of my parents wedding photos. If you haven't seen the past layouts, you can see all of them here.

 Here's the remainder of the double layouts. Hope you enjoy checking out these old photos! You can click on any of these pictures and it will enlarge for you, then just hit your back button to come back. I tried to keep them fairly simple so the project wouldn't overwhelm me, and so that the photos would be the center of attention.


I really enjoyed this project and felt honored to do this for my parents. They are such great people. They are still together after all these years....unfortunately, they are both dealing with some health issues, but I'm praying to have them around to see lots of great grandchildren!

Tuesday, August 16, 2011

Vintage Wedding Double Scrapbook Layout

We are home from work today helping my son pack up for the big day tomorrow. He'll be heading off for his Freshman year at Ball State University. He is pretty excited and nervous. We feel the same way...torn between excitement for him, and beginning to feel lost without him. However, we are very proud of him and will soon settle into this next phase of life...empty nest!

Now that I'm feeling all sentimental, it is the perfect time to share the first few pages of a new project. When we cleaned out my parents' condo, I found their wedding album and it pretty much fell apart in my hands. So, I brought all of their 8 x 10 original wedding photographs home with me. The goal is to preserve them, and I feel the best way to do that is to get them into a photo safe album that will hopefully last even longer than the first one. In order to have the pictures available for reprint, I first scanned each one and saved them in a separate folder (and backed them up). Then, came the fun part where I could get a little creative.

Here is the first page of the album. The flowers are from a tube that I purchased quite awhile back. I like their vintage look. I used some paper punched flowers to add to the centers and pick up the pastels of their wedding colors. The swirls are cut from with the Sweethearts Cricut cartridge. I like the soft tone-on-tones paper together with the newsprint.

The base paper for all of my layouts is from StampinUp. The entire pack is full of 4 different variations of newsprints. I thought it was perfect because of the faded, yellow look in the pictures. Neither black nor white seemed to work for me. I like the look of the newsprint, and I think that my parents will too. They have a pretty laid back, eclectic, casual and simple style. All of the photos are black and white or should I say cream and gray now that they've faded quite a bit. I found a newspaper article that described the pastel colors of the bridesmades dresses and the flowers, so my color scheme will match. 

I love how thre black titling really pops. I will use this throughout the album to help tie it all together. The font is from Quarter Note cricut cartridge. The flowers are handmade using layers of scalloped scircles. After punching them out I wadded each one up individually and then layered 3 together to give it depth. The other smaller flowers are created with a SU punch that cuts 3 different types of small flowers at the same time. I used these as centers of the larger flowers and added a gemstone for the very center. There won't be much journalling in the album, but I did add a description here of my Mother's wedding gown. All of this information came from the same article in the newspaper. I'm so glad that she saved that article because it really made these old photographs come alive for me. I typed out the description and printed it on cardstock using my commputer printer. I then matted it to match the photos on the page.  

Here are the two pages together.  

Thanks for stopping by....You'll be seeing more of these layouts really soon. It's been such a fun project so far. I've finished about 3/4 of the project already! Can't wait to finish it up. Scrappin time has been minimal lately....sad face.

Wednesday, August 18, 2010

More cards to share

Hello friends! Happy Wednsday. I have some more cards to share with you today so I'll get right to it.

This first one is my favorite of the three. It was designed for my parents 56th anniversary!! I don't know if I shared before that my son Joel was married on their anniversary on August 7. So while I was making the wedding card, I was making an anniversary card for my parents. Kind of special, right?? I love that they will share their anniversaries. Anyway, back to the card....Everything was cut with my Cricut machine "Sweethearts" cartridge. All of the layers are included and cut to size. I sprayed the nest with brown smooch spray to give it a dirty, sparkly look. The red heart has some flocking. This was my 2nd attempt using flocking. First time was not as cute. =)

This one is a sympathy card for my son's girlfriend who lost her Grandmother. I used a sketch from "Clean and Simple" blog. The tree is a Stampin Up stamp.
The last one is really the same sketch I used for the sympathy card, except this one is a baby girl card. It was quick and easy.
Thanks for looking. I appreciate all of the great comments I've received on my blog lately!!! It's always nice to know that somebody is inspired!