Showing posts with label Basic Grey. Show all posts

Friday, January 3, 2014

Double Scrapbook Layout - " Life's Moments"

Happy New Year!! Here's hoping that your 2014 will be filled with more joy than sadness, and more blessings than your heart can hold. We're expecting our second grandbaby in April, and can hardly wait to meet this bouncing baby boy. It's so exciting that we will have another generation to carry on our family name. We're also thrilled for our son and daughter-in-law to be blessed with both a girl and a boy in their family. We had great fun raising two boys, and I always wondered what it would have been like to have a girl. Having a granddaughter to fuss over and spoil has been such a treat for us!

Have you started working on any of your Christmas photos yet? I'm hoping to start working on mine this weekend. Maybe this layout from Christmas 2012 will inspire you in some way. I am honestly not a huge fan of scrapbooking Christmas photos. They tend to look similar year after year. But, last year I actually completed several festive layouts, and was happy with each of them. I find that it's more appealing now that our family is growing and changing again each year with grandbabies and grandnephews. =)

 These pictures were taken with my hubby's side of the family in Michigan. Mark's nephew and niece-in-law have a toddler, and our granddaughter was about 8 months old at that time. Oh what fun!!! I adore the picture of my granddaughter (bottom right) as she spots her face in the mirror on the toy! She couldn't stop squealing and smiling at herself! The patterned papers are Basic Grey's Aspen Frost. The "moments" part of the title is cut with Cricut's Graphically Speaking cartridge. This is my "go to" cartridge when I can't think of a creative title. The word "LIFE'S" was cut with Nate's ABC's cartridge.
The Stampin Up five petal flower punch makes a cute, quick Christmas flower, especially with two layers of red cardstock. The red ribbon is from Michael's. The snowflake border sticker (Aspen Frost) was sliced in half lengthwise for twice the yardage. The decorative label punch comes in handy for journaling.
 What do you think of my tree? This was cut with Art Philosophy. The swirls are cut into the top layer, so the bottom layer shows through. The swirls were to cute to waste so I cut it into pieces and layered them under the punched flowers. I distressed the top layer with ink and used multi-colored pearls from Me & My Big Ideas, then topped it with a snowflake sticker.

I am a huge fan of using wallet prints on my pages! They help to add some variety to a collage. You can even cut them into squares. There are 11 pictures on this layout!!

Thanks for stopping by my blog today. I'm super excited to be scrapping Friday and Saturday! It's been a few months since the last time. Hopefully it won't take me too long to get back in the groove!!

Have a productive and fun weekend!!

Friday, December 27, 2013

Two Page Layout - "Merry Christmas"

The day after Christmas is a great day to wind down from all of the Christmas hustle and bustle. There is plenty of time to shop the sales, eat leftover Christmas goodies, and just chill out on the couch. Hope your Christmas was merry and blessed!

Grandbabies bring so much additional joy to Christmas. We took tons of pictures over the last week, and I can't wait to scrap them all!! In the mean time, I will continue to share a couple more Christmas layouts from last year.

 The great patterned paper is Basic Grey's Aspen Frost collection. I love this paper. Using a matching set of Christmas paper makes it so easy to add layers to the design.
I glittered the chipboard snowflake and the negative to add some sparkle to the page.
 
 I try to maximize the supplies and add as many photos as pleasingly possible to the page. Wallet sized photos work great for events like Christmas. Anchoring all of the photos to the horizontal banner in the center, helps to draw your eye to each of the photos without it being overwhelming.

Thanks for stopping by my blog today!! I hope you are able to enjoy some additional time with your families during the holidays and maybe, just maybe, some crafty time.

Thursday, August 8, 2013

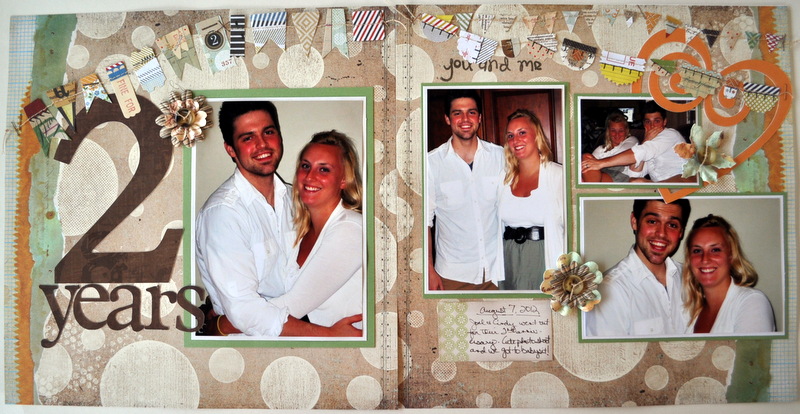
Two double layouts - "2 Years" and "We Love our Charlie"

Where does the time go? My oldest son and beautiful daughter-in-law just celebrated their 3rd wedding anniversary, and my youngest son is heading off for his Junior year in college! Time just keeps flying along, doesn't it?

In honor of my great kids, I have a couple of layouts to share with you today. First up, is a two page layout featuring pictures of my son and daughter-in-law a year ago on their 2nd anniversary.
 Aren't they cute! We are so proud of them! The patterned paper and paper banner are Basic Grey's "Clippings" and Little Yellow Bicycle. My scrappy friend got me this collection for my birthday and I've had a lot of fun with it. I adore the banners!!
 The title is Cricut's "Plantin Schoolbook" (an oldie but a goodie) and the heart is from "Sweethearts". I love these kids and their goofiness.
In honor of my youngest going back to BSU, here's a layout of pictures from the football game on parent weekend last October. Isn't he cute?? He's the tall one with the great teeth!
I had a lot of great pictures to fit on these pages, so I kept it simple with black and red matting, a few embellishments like the red washi tape, and a little snip-it of ribbon. It was breast cancer awareness week, so I added a little dash of pink since there was so much of it in the photos.
 As always, family weekend and the football game were tons of fun. I'm sure we'll be down there again this year snapping more photos.
Here are the two pages together! Go Cardinals..."Chirp-Chirp"!
Thanks for stopping by my blog today! Have a great weekend!!

Wednesday, March 7, 2012

Two double layouts - "The Climb" and "Natural Beauty"

Happy Wednesday! Hope you are all enjoying your week.

Today I have two layouts from the Adirondack Mountains in New York to share with you. Whiteface Mountain is in Wilmington, NY near Lake Placid. I was there at a class updating my insurance designation and we were so blessed to be able to do some sight-seeing!!

The first layout is mainly Basic Grey. The papers seemed to have a "royal" flare and worked well to highlight the cool stone castle on top of the mountain.

The diecuts were all cut with the Art Philosophy cartridge. The gemstones on each Fleur di lis helped them pop off the page along with a little bit of Tim Holtz pumice stone ink around the edges. I love my husband sitting in this old chair made of birchwood inside the castle. This place was too cool! The key in the bottom right hand corner is also cut with Art Philosophy. I covered it with Glossy Accents to make it shiny and a little bit 3D. 

Here are the pages side by side.

This next layout highlights some of the great views that we saw on our way up and back down the mountain. I have plenty more layouts to show you from this trip last September. I'm about done with the mountain layouts, and will be starting my pictures from Niagara Falls, next time I get a chance. 

Here's the quaint building that welcomes you to the beautiful scenic drive up the mountain. They told us it would be a bit foggy up there for a little while, but that it would clear, and they were exactly right. The chipboard and letters were purchased and made it a quick layout. I added some Tim Holtz masking tape and a little bit of ribbon.

Here are the two pages side by side. 

Thanks for stoping by my blog today. I need to photograph some cool snow layouts that I did recently, and hope to post those next time. Until then, enjoy your week!!