Showing posts with label altered project. Show all posts

Friday, April 18, 2014

Altered Keepsake Boxes

Last fall, I bought some cardboard boxes to decorate for gifts for some young ladies at our church. What a fun project! 
 

 I used My Minds Eye scrapbook paper. This particular pad of paper is filled with pretty chevrons and woodgrains...two of my favorite patterns to work with. =)
 I measured and traced around all sides of the box. After the dry fit to be sure each piece was right, I glued it all down with Mod Podge.
 I even covered the inside of each box.
I used washi tape along the edge of the lid. It was the perfect width and the colors all matched perfectly.
 After the box was covered with paper, I brushed Mod Podge over the entire inside and outside of the box, letting it dry hard in between coats. I gave it three coats making sure to seal all of the edges and surfaces.
I purchased a drawer pull to use as a handle for the top of the box. My husband drilled a small hole in the cardboard top. He also cut off the excess length of the screw.  I used two different sized scalloped circle punches (4 layers from each size punch) to make a flower out of magazine pages. I punched a whole in the center of all the layers, then put the drawer pull through, and attached it with a small nut on the inside.
I added a large rhinestone to the top of each pull for a little extra bling. I hope the girls are enjoying their boxes and tucking away all kinds of fun keepsakes. Thanks for stopping by my blog today.


Sunday, November 24, 2013

Altered Guest Book

My husband's sister and brother-in-law celebrated their 40th wedding anniversary in July! What a milestone!! They had a big party in their back yard. I offered my help, of course, and she asked me to decorate a guest book for her, to make some tags for the food, and a few decorations.

I bought a plain white guestbook at Hobby Lobby. First I covered the inside flaps of the book with matching red paper. I stamped it all over with watermark ink in a vintage floral pattern. Sorry, I didn't take a picture of the inside.
I attached some adhesive backed burlap ribbon all the way around the front flap. The ready made flower came from Meijers and I added a corner of burlap behind it as I attached it. The square brad was lurking in my stash and looked nice on top of a small square of fringed burlap. The white scrappers floss tied in a bow with multiple loops, attaches a decorative key.
 
The place cards were made with Stampin Up's Cherry Cobbler paper and ink. I used Close to My Heart's "Frame it Up" stamp set which coordinates with Cricut's Art Philosophy cutting cartridge. This was such an easy project!
I also made a few tags for her wedding party. She wrote each of their names on the tags, along with their role in the wedding, and attached it to their bouquets. These were made with two different SU punches, and then hole punched.
Last but not least, I made a few decorations with cupcake liners, Styrofoam balls, straight pins, and a glue gun.

 
Thanks for stopping by today! Hope you have a productive weekend.


Tuesday, September 10, 2013

Two Page Layout - "Squeaky Clean" and lively lantern redo

Summer is back for a few days. Hope you are enjoying your air conditioning like I am.

I spent the last few days photographing layouts, uploading, and editing. Wow! I have many layouts to share with you. It's been awhile since I posted a grandbaby layout. Here's a bath layout of our sweet Scarlet Rose. I'm probably not sharing her layouts in chronological order, but this one grabbed me today.
 All of the patterned paper is from a stack of Martha Stewart baby girl paper that I picked up for a song at Meijer. I keep reminding myself I need to use the baby paper as much as possible, because she's growing up so quickly.
 I cut big chunky letters and layered together little yellow ducks and dry embossed them both in the Cuddlebug for additional texture.
 This was probably the last time we bathed her in the kitchen sink. She is big enough to splash and play in the bathtub now. We are so blessed to have her. Little girls are so much fun!

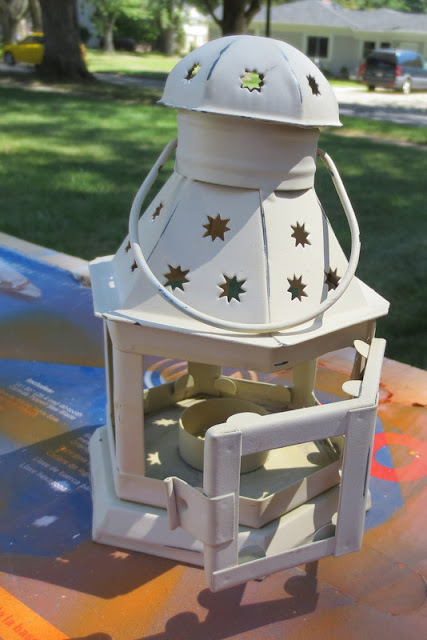
Since we're having such a great summer day, I'll share a recent spray paint project. I had three matching neutral metal lanterns on my porch that were pretty boring.
 After cleaning out the old wax, I cleaned them up and sanded them a little bit on all of the painted surfaces, and wiped them down with a damp cloth....Spray painting is so much fun! These lanterns got a major rebirth in three eye-popping colors.
 The blue is actually more of a teal color. Not sure why it looks blue here. I love the little battery operated flickering candles...No more dirty old wax to scrape out.
 It all started with this clearance rug from Walmart. The porch looks so much livelier and we've been spending more time out there since we gave it an inexpensive facelift with accessories.

Thanks for stopping by my blog today!!

Saturday, March 30, 2013

Bird project

For some reason, I don't have very many Easter decorations. As mentioned before, I'm kind of an owl freak, but I recently added this little birdy to the mix.

Here is the story of this little birdy. I bought him really "cheep" at the craft store. I think it was his cute little wire legs that attracted me.

Once I got him home, I grabbd the Mod Podge, a paint brush, and an old book. Mine is actually an old Hymnal that I rescued. The pages work great for all kinds of projects and it's a great way to give these old Hymns new life in a prominent place in my home.
Tear the pages into strips of different sizes. (Yikes...I know it's hard to tear something out of a book.) Brush ModPodge just over the area where you will be applying the next strip of paper. This gives you a place to hang on without getting your hands all gluey.  Once you have it covered all the way around on both sides and the edges, you can add a little color by smearing ink all over it.
I like a vintage look, so the ink is random. I used leftover strips of paper to smear on the ink. The next step is more ModPodge over the entire bird. Put on a thick layer and let it dry over night.
I used a black Sharpie marker to color two large rhinestones for eyes (see top picture). My pretty yellow birdy has made friends with the other feathered friends on my table. Have a wonderful Easter. 


Isaiah 53:3-6
  3 He was despised and rejected by mankind,
a man of suffering, and familiar with pain.
Like one from whom people hide their faces
he was despised, and we held him in low esteem.

4 Surely he took up our pain
and bore our suffering,
yet we considered him punished by God,
stricken by him, and afflicted.
5 But he was pierced for our transgressions,
he was crushed for our iniquities;
the punishment that brought us peace was on him,
and by his wounds we are healed.
6 We all, like sheep, have gone astray,
each of us has turned to our own way;
and the Lord has laid on him
the iniquity of us all.