Showing posts with label burlap ribbon. Show all posts

Wednesday, August 1, 2018

Two Page Scrapbook Layouts - Mackinaw Island

Mackinaw Island is one of our favorite places to visit. Whether we're lucky enough to spend a long weekend there, or even just a day trip, it's so much fun! Here's a few layouts from a few summers back. Our son joined us for the trip. We had a great time!

First....."Are We There Yet" - A layout of our bike ride around Mackinaw Island.
 Even I made it all the way around!! I had to walk my cruiser bike up one of the hills, but aside from that, the 8.2 mile trip was a breeze! My son and husband bike often and go much farther, so I was happy to keep up with them, for the most part.
 We rented our bikes and mine was a cruiser! I came home convinced that I needed to replace my mountain bike with a cruiser! For my birthday that year, I picked out my very own Electra Townie 7D. Oh my word...so much more comfortable and I love riding again.
Gorgeous views all the way around the island. Lots of places to stop, rest, skip stones, and take pictures.

We stayed one night on the island at a beautiful bed and breakfast just one street back from the main drag. What a gorgeous place! The flowers and the hospitality were amazing.

"Flower Power" at the Metevier Inn, Mackinaw Island
 I must admit this is probably the first time I've ever used lavender card stock! :) I like the way it turned out, though. I can almost smell the flowers.
 Such a fun place to stay. They thought of everything to make our stay memorable.
If you've never been, you need to go and experience Mackinaw Island overnight. Maybe I should start collecting commissions from the MI Convention Bureau. 😃 You really don't need to go to California or Florida to experience beautiful coastal views and beaches. #puremichigan

Saturday, October 26, 2013

Burlap Wreath for Fall

A few weeks ago we got out our box of all decorations and enjoyed decorating our home with all things autumn. It's my favorite time of year! Part of the reason behind that is the great decorations, and the fact that you can use fall decorations from September through Thanksgiving. Unfortunately, the wreath we had last year was nowhere to be found in the attic. Very strange, but an excellent excuse to make one.

Here's what I came up with.
 I purchased this straw wreath from one of the craft stores last year. I bought the letter "L" ($2) and the cute little bird ($1.50) along with the roll of burlap ($6) at Michaels. I'm not sure how much I paid for the wreath last year, but they're not very expensive.
 First I rolled the burlap ribbon all around the wreath, pinning it periodically so it stays in place. Then I started rolling the burlap flowers, using a hot glue gun and pushing the flower down onto an adhesive disk like Glubers. Then I found this fabulous flannel in my closet. Seriously? Why do I keep these things. If I remember correctly, my son used this for some school project and I couldn't throw it out. Now I'm glad I held onto it. Same idea with the felt flowers, except I clipped the folded over edge of the fabric strip every 1/4" to 1/2" or so. See below for links for flower tutorials that I used.
 The orange paint was leftover from my summer lantern spray painting project. It matched the flannel nicely.
 I pieced together a bow out of the flannel. I couldn't get a real tied bow out of it since the fabric is white on the other side. I didn't like how it looked, so I made two loops, stapled them together in the middle, and wrapped a narrow strip around it for the knot. I cut one more strip about 10" long to be used for the hanging ends of the bow. I poked it through the strip that was used as the fake knot in the center, and then notched out the ends to give each side two points.
Have you made a fall wreath this year? I'd love to see your creation, just attach a link in your comment so we can all take a look. Here are the links to the flower tutorials. Burlap rosette HERE from Shabby Love and rolled felt flowers from the The Crafted Sparrow HERE. Again, I used flannel because I had it on hand and I liked the Chevron pattern.

Have fun!

Tuesday, October 15, 2013

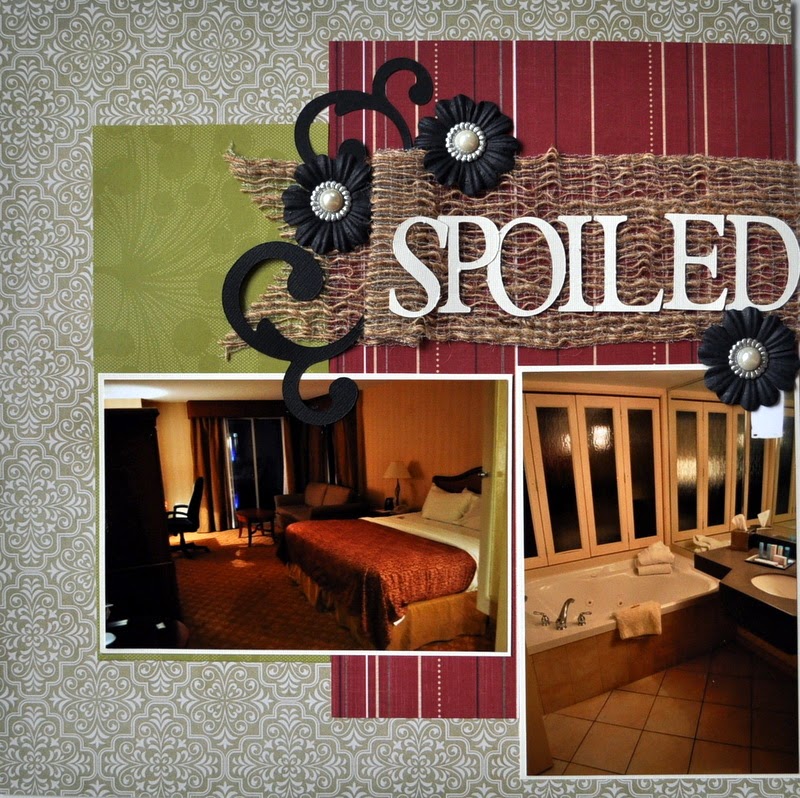
Two double Layouts from Niagara Falls - "Breakfast with a View" and "Spoiled"

Two years ago my husband and I stopped at Niagara Falls on our way out to New York for a work trip. We hadn't been in years! I completed these layouts awhile ago, but they caught my eye today as I was going through my layouts trying to decide what to post.

If you've never been to Niagara Falls, I would highly recommend it. Our buffet breakfast was included with our room package. The breakfast was fabulous, but the view was truly amazing.
Thepaper is from Cloud 9 Design. Don't you love the shot of the waitress flipping out the fresh table cloth? We definitely caught her in the act. My hubby probably took the photo, because he's better at catching the action.
 The flower accents were a combination of stickers and some cut by hand from one of the paper designs in the stack. Some of the layers are popped out with dimensionals. The font is Cricut's "Lyrical Letters".

Here are some pictures of our spacious hotel room. I've never stayed in a room like this before. Quite impressive for the deal we got! Some people truly love camping, but I much prefer a beautiful hotel room. =) The burlap ribbon under the title adds a lot of texture to the page. The flowers are Prima with some brads from my stash. I cut the black swirls with my Cricut. The addition of black seemed to help pull it all together for me.
The patterned paper is Pink Paislee "Indigo Bleu" and the stripe from Cloud 9 Design. The wall of folding windows in the bathroom opened up to the bedroom area. We really wished we had more time to enjoy the room, but it was just our first stop on a long agenda.
 The journaling block was cut with Cricut's Art Philosophy cartridge and then stamped with the matching Close to My Heart frame.
 Here's a close-up shot of the burlap, flowers, and title work.
 
Thanks for stopping by today. Have a lovely week!