I got some new cannisters from Meijer recently since my old Tupperware cannister lids were crumbling. I chose the Rubbermaid Brilliance pieces because they are easy to grip with one hand.
We recently moved into a newly built home and I am trying to improve on my cabinet organization, so I decided to try my hand at vinyl labels.
This was my first attempt at using vinyl! They turned out just as I'd hoped, so I think there will be lots more vinyl in my future. Here's a quick tutorial including all the basic info you'll need.
What you need:
Black matte vinyl
Transfer tape
Scissors
Scraping tool
Cricut or other cutting machine
Here's my before pic with my trendy sticky note labelling system. 😁 All that white stuff looks the same without labels!
Here we go!
1) I used Design Space to layout each of the labels separately. I chose "Straight & Simple" font because I'm a fan of the farmhouse style, but you can pick whichever font you like. Design each of your labels separately to the correct size and shape for your container. After you have filled your canvas with all of your designed labels, draw a box around all of them together and use the "attach" feature. This will allow you to keep everything laid out properly when you cut them. Otherwise your letters will get moved around on the matt before cutting....Not cool! Here's a picture of my design space canvas.

2) Use your scissors to cut a piece of black vinyl to fit whichever size matt you are using. Lay down the vinyl (with paper backing) directly onto your cutting matt and load it into the machine. Set your blade to "vinyl" before cutting. My machine cut through the vinyl perfectly, leaving the paper backing fully in tact. When it is done cutting, slowly peel back the unwanted vinyl. Your letters will stay on the white backing.
3) Use the weeding tool to pull out the centers of the letters that you don't need. This is my kind of weeding. It's easy and goes quickly.
4) Cut a piece of transfer tape that will fit over all of your letters at one time. I cut both my vinyl and the transfer tape at 12x12 since that's the size matt I was using. Peel the paper backing off of the transfer tape, then carefully lay the tape directly on top of your cut letters. The tape is fairly sturdy and it shouldn't roll back on itself.
5) Run your scraping tool firmly over every single letter to be sure the tape is sticking to every part of the letter. Then, peel your entire project off of the Cricut matt.
Cut out each of your labels keeping the words together if they are on two separate lines like mine are.
6) Wipe down your cannister where you plan to apply the label. Peel off the paper backing and place your label smoothly on the cannister. Use your scraping tool once again over every part of each letter to be sure the vinyl will stick well to the cannister.
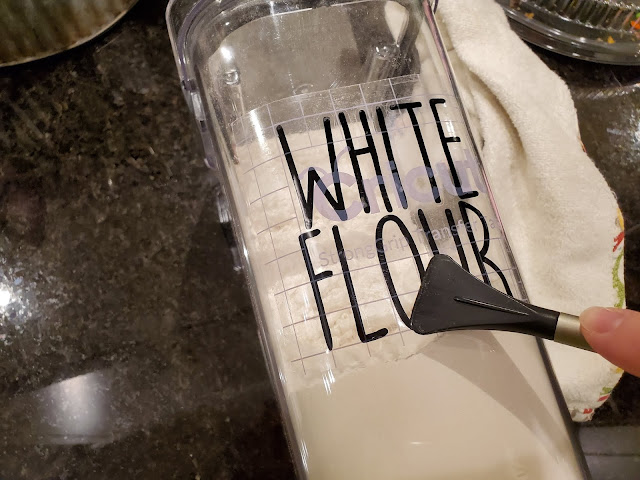
7) Once you have scraped down every letter you are now ready to slowly pull off the transfer tape. Do this by starting in one of the corners and pulling it off at a 45 degree angle to the letters. Be sure your letters are sticking to the cannister. If the vinyl letter starts to peel back with the tape, carefully put the tape back onto the cannister, use the scraping tool on that part of the letter again, and then carefully pull back the tape again. Tip: I used the Strong Grip Cricut Transfer Tape. I would recommend something with a little less grip, if you can find it. It works fine with the strong, but it might be a little easier to pull off it was a lighter grip.
You can see below how many labels I created. Once I had everything laid out in Design Space, the actual cutting and adhering only took about an hour. I'm pretty pumped about how they look! I may have to leave my cabinet doors open for all to see. 😍
Let me know if you try this project! It's fun stuff!!
Thanks for stopping by my blog today!!


